Nautilus File Manager
This chapter describes how to use the Nautilus file manager.
- I.7.1. Introduction to Nautilus File Manager
- I.7.2. Nautilus Windows
- I.7.3. Navigating Your Computer and the Internet
- I.7.4. Managing Your Files and Folders
- I.7.5. Running Scripts From Nautilus
- I.7.6. Modifying the Appearance of Files and Folders
- I.7.7. Assigning Actions to Files
- I.7.8. Customizing Nautilus
I.7.1. Introduction to Nautilus File Manager
The Nautilus file manager provides an integrated access point to your files and applications. Nautilus enables you to do the following:
- Display your files and folders.
- Manage your files and folders.
- Run scripts.
- Customize your files and folders.
You can also use Nautilus to browse the Web, but you can only view pages that contain HTML code. You can not view web pages that contain other types of code, for example, JavaScript. Nautilus also manages the desktop where your panels, menus, and windows are displayed.
Nautilus windows enable you to display and manage your files and folders. You can open a Nautilus window in any of the following ways:
- Double-click on the Home object on the desktop background.
- Choose .
- Right-click on the desktop background to open the menu. Choose .
The Nautilus window displays the contents of your home location in the view pane.
I.7.2. Nautilus Windows
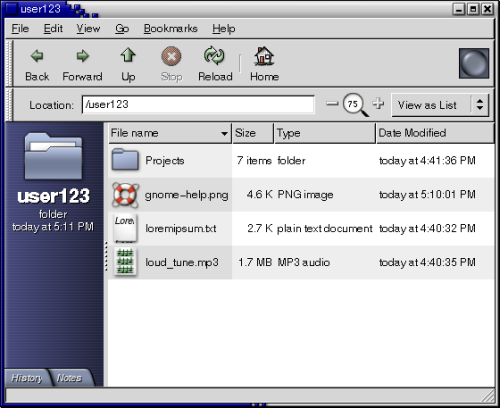
Nautilus windows enable you to display and manage your files and folders. Figure I.7-1 shows a Nautilus window that displays the contents of a folder.
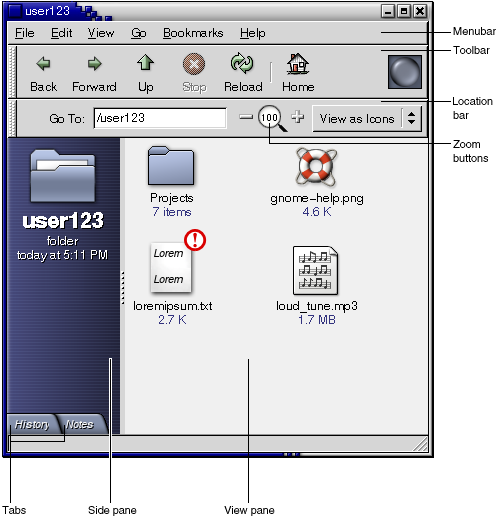
Table I.7-1 describes the components of Nautilus windows.
| Component | Description |
|---|---|
| Menubar | Contains menus that you use to perform tasks in Nautilus. |
| Toolbar | Contains buttons that you use to perform tasks in Nautilus. |
| Location bar |
Contains the following elements:
|
| Side pane |
Performs the following functions:
|
| Tabs |
Click on a tab to open a tabbed pane. The side pane contains the following tabbed panes:
|
| View pane |
Displays the contents of the following:
|
| Resize handle | Grab this handle then drag to resize the side pane and view pane. |
| Statusbar | Displays status information. |
You can also open a popup menu from Nautilus windows. To open this popup menu right-click in a Nautilus window. The items in this menu depend on where you right-click. For example, when you right-click on a file or folder, you can choose items related to the file or folder. When you right-click on the background of a view pane, you can choose items related to the display of items in the view pane.
- I.7.2.1. View Pane
- I.7.2.2. Side Pane
- I.7.2.3. Tabbed Panes
- I.7.2.4. Icons and Emblems
I.7.2.1. View Pane
The view pane can display the contents of the following:
- Particular types of files
- Folders
- Websites
- FTP sites
Nautilus contains viewer components that enable you to display particular types of file in the view pane. For example, you can use a web page viewer to display HTML files in the view pane. The following figure shows a plain text document displayed in the view pane.

Displaying a file in the view pane provides the following benefits:
- Uses less system resources than when you launch an application.
- Takes less time than when you launch an application.
However, you can not edit a file in the view pane.
Click on the button to reload the contents of the view pane.
Nautilus also includes views that enable you to display the contents of your folders in different ways. For example, you can display the contents of a folder in the following types of view:
- Icon view: Displays the items in the folder as icons.
- List view: Displays the items in the folder as a list.
Use the menu to choose how to display a folder. For more information on views, see Section I.7.6.4 ― Using Views to Display Your Files and Folders.
I.7.2.2. Side Pane
The side pane can contain the following elements:
- An icon that represents the current file or current folder. The side pane also contains information about the current file or current folder.
- Tabbed panes that enable you to navigate through your files and the online help system.
- If a file is displayed in the view pane, buttons appear in the side pane. The buttons enable you to perform actions on a file, other than the default action.
I.7.2.3. Tabbed Panes
The side pane contains the following tabbed panes:
-
History
Contains a history list of files, folders, and URLs that you have recently visited.
-
Notes
Enables you to add notes to your folders.
-
Tree
Displays a hierarchical representation of your file system. You can use the Tree tabbed pane to navigate through your files.
Table I.7-2 describes how to work with tabbed panes.
| Task | Action |
|---|---|
| Open a tabbed pane. | Click on the tab. |
| Close a tabbed pane. | Click on the tab. |
| Remove a tab from the side pane. | Right-click in the side pane, then choose the tab that you want to remove from the popup menu. |
| Add a tab to the side pane. | Right-click in the side pane, then choose the tab that you want to add from the popup menu. |
I.7.2.4. Icons and Emblems
In icon view, Nautilus displays your files and folders as icons. You can add emblems to your file icons and folder icons. An emblem is a small icon that you can add to an item to visually mark the item. For example, to mark a file as important, you can add an Important emblem to the file icon to create the following visual effect:
For more information on how to add an emblem to an icon, see Section I.7.6.1 ― To Add an Emblem to a File or Folder.
The following table describes the structure of the file icon:
| Component | Description |
|---|---|
| Emblem. This emblem is the Important emblem. | |
| Icon that represents the file. This icon contains a preview of the content of the file. | |
| Icon caption. You can modify what items of information are displayed in the icon caption. |
Nautilus includes default emblems for the following types of item:
Symbolic links
-
Items for which you have the following permissions:
- Read permission only
- No read permission and no write permission
The default emblems change depending on your theme. The following table shows the default emblems for the Default theme.
| Default Emblem | Description |
|---|---|
 |
Symbolic link |
 |
Read permission only |
 |
No read permission and no write permission |
I.7.3. Navigating Your Computer and the Internet
Each Nautilus window displays the contents of a single file, folder, or URL. This section describes the following:
- How to display items in Nautilus windows.
- How to open files from Nautilus windows.
- How to navigate the files and folders in your file system.
- How to navigate the Internet.
- I.7.3.1. To Display Your Home Location
- I.7.3.2. To Display a Folder
- I.7.3.3. Using the Tree Tabbed Pane
- I.7.3.4. Opening Files
- I.7.3.5. Using the Start Here Location
- I.7.3.6. To Navigate the World Wide Web
- I.7.3.7. To Access FTP Sites
- I.7.3.8. Using Your Navigation History
- I.7.3.9. To Bookmark Your Favorite Locations
I.7.3.1. To Display Your Home Location
To display your home location, perform one of the following actions:
- Double-click on the Home object on the desktop background.
- On a Nautilus window, choose .
- On a Nautilus window, click on the toolbar button.
The Nautilus window displays the contents of your home location. To reload the display, click on the button.
For information on how to set your home location, see Section I.7.8.1.8 ― To Set Navigation Preferences.
I.7.3.2. To Display a Folder
You can display the contents of a folder in any of the following ways:
- Double-click on the folder in the view pane.
- In the Location field, type the path of the folder that you want to display, then press Return. The Location field includes an autocomplete feature. As you type a path, Nautilus reads your file system. When you type enough characters to uniquely identify a directory, Nautilus completes the name of the directory in the Location field.
- Use the Tree tabbed pane. For more information, see Section I.7.3.3 ― Using the Tree Tabbed Pane.
- Use the toolbar button and the toolbar button to browse through your navigation history.
To change to the folder that is one level above the current folder, choose . Alternatively, click on the toolbar button.
To reload the display, click on the button.
If you can not find the folder that you want to display, you can use Search Tool. To start Search Tool, choose .
I.7.3.3. Using the Tree Tabbed Pane
The Tree tabbed pane displays a hierarchical representation of your file system. The Tree tabbed pane provides a convenient way to navigate your file system. By default, the Tree tabbed pane is not displayed in your side pane. To add the Tree tabbed pane to the side pane, right-click in the side pane, then choose from the popup menu.
The following figure shows the Tree tabbed pane.
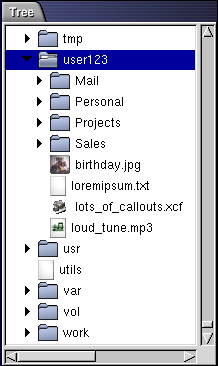
In the Tree tabbed pane, folders are represented as follows:
| Folder State | Graphic Representation |
|---|---|
| Closed folder | Right arrow |
| Open folder | Down arrow |
Table I.7-3 describes the tasks that you can perform with the Tree tabbed pane, and how to perform the tasks.
| Task | Action |
|---|---|
| Open the Tree tabbed pane. | Click on the Tree tab. |
| Close the Tree tabbed pane. | Click on the Tree tab. |
| Open a folder in the Tree tabbed pane. | Click on the arrow next to the folder in the Tree tabbed pane. |
| Close a folder in the Tree tabbed pane. | Click on the arrow next to the folder in the Tree tabbed pane. |
| Display the contents of a folder in the view pane. | Select the folder in the Tree tabbed pane. |
| Display the contents of a file in the view pane. | Select the file in the Tree tabbed pane. |
You can set your preferences so that the Tree tabbed pane does not display files. For more information, see Section I.7.8.1.7 ― To Set Side Pane Preferences.
I.7.3.4. Opening Files
When you open a file, Nautilus performs the default action for that file type. The default action can be one of the following:
- Launch an application that opens the file.
- Use a viewer component to display the file in the view pane.
Nautilus checks the contents of a file to determine the type of a file. If the first lines do not determine the type of the file, then Nautilus checks the file extension.
If you can not find the file that you want to open, you can use Search Tool. To start Search Tool, choose .
- I.7.3.4.1. Viewing Files in the View Pane
- I.7.3.4.2. To Execute the Default Action
- I.7.3.4.3. To Execute Non-Default Actions Using the Open With Submenu
- I.7.3.4.4. To Execute Other Actions When Displaying a File
I.7.3.4.1. Viewing Files in the View Pane
Nautilus contains viewer components that enable you to display particular types of file in the view pane. For example, you can display the following types of files in the view pane:
- Plain text files
- HTML files
- PostScript files
- Portable Document Format (PDF) files
- Portable Network Graphics (PNG) files
- Joint Photographic Experts Group (JPEG) files
When you display a file in the view pane, the viewer component might add menu items to the Nautilus menus. The menu items relate to the file type that is displayed. For example, when you display a PNG file, the menu contains , , and other submenus.
Also, when you display a file in the view pane, you can use the Nautilus zoom buttons to change the size of the item.
I.7.3.4.2. To Execute the Default Action
To execute the default action for a file, double-click on the file. For example, if the default action for plain text documents is to display the file in a text viewer. In this case, you can double-click on the file to display the file in a text viewer.
You can set your Nautilus preferences so that you click once on a file to execute the default action. For more information, see Section I.7.8.1.5 ― To Set Icon and List Views Preferences.
I.7.3.4.3. To Execute Non-Default Actions Using the Open With Submenu
To execute actions other than the default action for a file, perform the following steps:
- In the view pane, select the file that you want to perform
an action on. Choose . The
submenu opens. The items in this submenu correspond to the contents of the
following parts of the File Types and Programs
desktop preference tool:
- Default action drop-down list box in the Edit file type dialog
- Viewing component drop-down list box in the Edit file type dialog
- Choose an action from the submenu.
I.7.3.4.4. To Execute Other Actions When Displaying a File
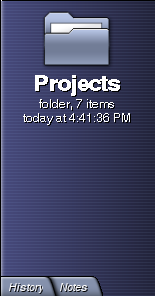
When you display a file in the view pane, the side pane might contain buttons. Figure I.7-2 shows the side pane when a text file is displayed in the view pane.

The buttons represent any actions that are defined in the File Types and Programs desktop preference tool. The actions are defined in the Default action drop-down list box in the Edit file type dialog in the File Types and Programs preference tool. Click on a button to execute an action. For example, if an action defined for plain text documents is to open the file in gedit. If this action is defined, an button is displayed in the side pane. To open the file in the gedit application, click on the button.
A button that represents the action does not appear in the side pane if the actions are excluded in either of the following dialogs:
- Open with Other
- View as Other
I.7.3.5. Using the Start Here Location

The Start Here location enables you to access the following desktop functions:
-
Applications
Double-click on Applications to access your key GNOME applications. You can also access the menu through the and the Menu Panel.
-
Desktop Preferences
Double-click on Preferences to customize your desktop. For more information on how to customize your desktop, see Part II ― Customizing Your GNOME Desktop.
Programs that enable you to configure your system as a server, and to choose other system settings.
You can access the Start Here location in the following ways:
-
From a Nautilus window
Choose . The contents of the Start Here location are displayed in the window.
-
From the desktop background
Double-click on the Start Here object on the desktop background. The contents of the Start Here location are displayed in a Nautilus window.
I.7.3.6. To Navigate the World Wide Web
You can use Nautilus as a browser to view websites, but you can only view pages that contain HTML code. You can not view pages that contain other types of code, for example, JavaScript.
To view a HTML-only website, enter the URL for the site in the field on the location bar, then press Return. The contents of the site are displayed in the view pane. To reload the current page, click on the button.
When you display a website in the view pane, the side pane might contain buttons. The buttons represent any actions that you can perform on the web page that is displayed in the view pane. To execute an action on the web page, click on the button that represents the action.
For example, when you display a HTML document in the view pane, an button is displayed in the side pane. To open the file in Netscape, click on the button.
I.7.3.7. To Access FTP Sites
You can use Nautilus to access FTP sites. To access an FTP site, enter the URL for the site in the field on the location bar, then press Return. The contents of the site are displayed in the view pane. To copy a file from the FTP site, drag the file to the new location.
I.7.3.8. Using Your Navigation History
Nautilus maintains a history list of files, folders, and URLs. You can use the history list to navigate to files, folders, and URLs that you have recently visited. The following sections describe how to navigate your history list.
To clear your history list choose .
I.7.3.8.1. To Navigate Your History List Using the Go Menu
To display a list of previously-viewed items, choose the menu. Your history list is displayed in the lower part of the menu. To open to an item in your history list, choose the item from the menu.
I.7.3.8.2. To Navigate Your History List Using the Toolbar
To use the toolbar to navigate your history list, perform one of the following actions:
- To open the previous file, folder, or URL in your history list, click on the toolbar button.
- To open the next file, folder, or URL in your history list, click on the toolbar button.
- To display a list of previously-viewed items, right-click on the toolbar button. To open an item from this list, click on the item.
I.7.3.8.3. To Navigate Your History List Using the History Tabbed Pane
To display the History tabbed pane, click on the History tab in the side pane. The History tabbed pane displays a list of your previously-viewed items, as shown in the following figure:
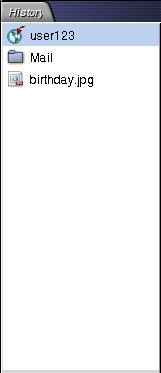
To display an item from your history list in the view pane, click on the item in the History tabbed pane.
I.7.3.9. To Bookmark Your Favorite Locations
To access an item in your bookmarks, choose the item from the menu. You can add your favorite locations to your menu. You can add bookmarks to locations on the Internet, or to files and folders in your file system.
By default, Nautilus contains certain bookmarks. You can set your Nautilus preferences so that the default bookmarks are excluded from the menu. For more information, see Section I.7.8.1 ― Setting Your Preferences.
- I.7.3.9.1. To Add a Bookmark
- I.7.3.9.2. To Edit a Bookmark
I.7.3.9.1. To Add a Bookmark
To add a bookmark, display the item that you want to bookmark in the view pane. Choose .
I.7.3.9.2. To Edit a Bookmark
To edit your bookmarks perform the following steps:
Choose . A Bookmarks dialog is displayed.
-
To edit a bookmark, select the bookmark on the left side of the Bookmarks dialog. Edit the details for the bookmark on the right side of the Bookmarks dialog as follows:
Dialog Element Description Name Use this text box to specify the name that identifies the bookmark in the menu. Location Use this field to specify the location of the bookmark. To remove a bookmark, select the bookmark on the left side of the dialog. Click Remove.
I.7.4. Managing Your Files and Folders
This section describes how to work with your files and folders.
- I.7.4.1. Drag-and-Drop in Nautilus
- I.7.4.2. To Select Files and Folders
- I.7.4.3. To Move a File or Folder
- I.7.4.4. To Copy a File or Folder
- I.7.4.5. To Duplicate a File or Folder
- I.7.4.6. To Create a Folder
- I.7.4.7. To Rename a File or Folder
- I.7.4.8. To Move a File or Folder to Trash
- I.7.4.9. To Delete a File or Folder
- I.7.4.10. To Create a Symbolic Link to a File or Folder
- I.7.4.11. To Change Permissions
- I.7.4.12. Using Trash
- I.7.4.13. Adding Notes to Folders
I.7.4.1. Drag-and-Drop in Nautilus
You can use drag-and-drop to perform several tasks in Nautilus. When you drag-and-drop, the mouse pointer provides feedback about the task that you perform. Table I.7-4 describes the tasks that you can perform with drag-and-drop. The table also shows the mouse pointers that appear when you drag-and-drop.
| Task | Action | Mouse Pointer |
|---|---|---|
| Move an item | Drag the item to the new location. |  |
| Copy an item | Press-and-hold Ctrl, then drag the item to the new location. |  |
| Link to an item | Press-and-hold Shift , then drag the item to the location where you want the link to reside. |  |
| Ask what to do with the item you drag |
Press-and-hold Alt, then drag the item to the location where you want the item to reside. Release the mouse button. A popup menu appears. Choose one of the following items from the popup menu:
|
 |
I.7.4.2. To Select Files and Folders
You can select files and folders in several ways in Nautilus. Table I.7-5 describes how to select items in Nautilus windows and on the Nautilus desktop background.
| Task | Action |
|---|---|
| Select an item | Click on the item. |
| Select a group of contiguous items |
Press and hold Shift. Click on the first item in the group, then click on the last item in the group. Alternatively, drag around the files that you want to select. |
| Select multiple items |
Press-and-hold Ctrl. Click on the items that you want to select. Alternatively, press-and-hold Ctrl, then drag around the files that you want to select. |
| Select all items in a folder | Choose . |
To perform the default action on an item, double-click on the item. You can set your Nautilus preferences so that you work with Nautilus as follows:
- Click once on a file to execute the default action.
- Point to an item to select the item.
For more information, see Section I.7.8.1.5 ― To Set Icon and List Views Preferences.
I.7.4.3. To Move a File or Folder
The following sections describe the ways you can move a file or folder.
- I.7.4.3.1. Drag to the New Location in a View Pane
- I.7.4.3.2. Cut and Paste to the New Location
- I.7.4.3.3. Drag to the New Location in the Tree Tabbed Pane
I.7.4.3.1. Drag to the New Location in a View Pane
To drag a file or folder to a new location in a view pane, perform the following steps:
- Open a Nautilus window. Choose to open a second Nautilus window.
- In one window, select the folder from which you want to move the file or folder. In the other window, select the folder to which you want to move the file or folder.
- Drag the file or folder that you want to move to the new location in the other window.
To move the file or folder to a folder that is one level below the current location, do not open a new window. Instead, drag the file or folder to the new location in the same window.
I.7.4.4. To Copy a File or Folder
The following sections describe the ways you can copy a file or folder.
- I.7.4.4.1. Drag to the New Location in a View Pane
- I.7.4.4.2. Copy and Paste to the New Location
I.7.4.4.1. Drag to the New Location in a View Pane
To copy a file or folder perform the following steps:
- Open a Nautilus window. Choose to open a second Nautilus window.
- In one window, select the folder from which you want to copy the file or folder. In the other window, select the folder to which you want to copy the file or folder.
- Press-and-hold Ctrl, then drag the file or folder to the new location in the other window.
To copy the file or folder to a folder that is one level below the current location, do not open a new window. Instead, press Ctrl and drag the file or folder to the new location in the same window.
I.7.4.5. To Duplicate a File or Folder
To create a copy of a file or folder in the current folder perform the following steps:
Select the file or folder that you want to duplicate in the view pane.
-
Choose . Alternatively, right-click on the file or folder in the view pane, then choose .
A copy of the file or folder appears in the current folder.
I.7.4.6. To Create a Folder
To create a folder perform the following steps:
Select the folder where you want to create the new folder.
-
Choose . Alternatively, right-click on the background of the view pane, then choose .
An untitled folder is added to the view pane. The name of the folder is selected.
Type a name for the folder, then press Return.
I.7.4.7. To Rename a File or Folder
To rename a file or folder perform the following steps:
Select the file or folder that you want to rename in the view pane.
-
Choose . Alternatively, right-click on the file or folder in the view pane, then choose .
The name of the file or folder is selected.
Type a new name for the file or folder, then press Return.
I.7.4.8. To Move a File or Folder to Trash
To move a file or folder to Trash perform the following steps:
- Select the file or folder that you want to move to Trash in the view pane.
- Choose . Alternatively, right-click on the file or folder in the view pane, then choose .
Alternatively, you can drag the file or folder from the view pane to the Trash icon on the desktop.
I.7.4.9. To Delete a File or Folder
When you delete a file or folder, the file or folder is not moved to Trash, but is deleted from your file system immediately. The menu item is only available if you select the Include a Delete command that bypasses Trash option in the Preferences dialog. For more information on this option, see Section I.7.8.1.3 ― To Set Preferences for New Windows.
To delete a file or folder perform the following steps:
- Select the file or folder that you want to delete in the view pane.
- Choose . Alternatively, right-click on the file or folder in the view pane, then choose .
I.7.4.10. To Create a Symbolic Link to a File or Folder
A symbolic link is a special type of file that points to another file or folder. When you perform an action on a symbolic link, the action is performed on the file or folder to which the symbolic link points. However, when you delete a symbolic link, you delete the link file, not the file to which the symbolic link points.
To create a symbolic link to a file or folder, select the file or folder to which you want to create a link. Choose . A link to the file or folder is added to the current folder.
Alternatively, press-and-hold Shift. Drag the item to which you want to create a link to the location where you want to place the link.
By default, Nautilus adds an emblem to symbolic links.
I.7.4.11. To Change Permissions
To change the permissions on a file or folder perform the following steps:
- Select the file or folder that you want to change.
- Choose . A properties dialog is displayed.
- Click on the Permissions tab. In the Permissions tabbed section, use the drop-down list boxes and check boxes to change the permissions for the file or folder.
- Click to close the properties dialog.
I.7.4.12. Using Trash
You can move the following items to Trash:
- Files
- Folders
- Desktop background objects
When you move an item to Trash, the item is temporarily stored in your /.Trash directory. If you need to retrieve a file from Trash, you can display Trash and move the file out of Trash.
When you empty Trash, you delete the contents of Trash permanently.
- I.7.4.12.1. To Display Trash
- I.7.4.12.2. To Empty Trash
I.7.4.13. Adding Notes to Folders
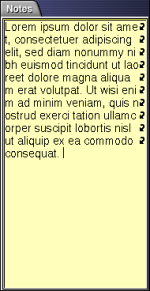
You can use the Notes tab to add a note to a folder. To add a note to a folder perform the following steps:
- Display the folder in the view pane.
- Click on the Notes tab to open the Notes tabbed pane. The Notes tabbed pane opens.
- Type the note in the Notes tabbed pane.
I.7.5. Running Scripts From Nautilus
Nautilus includes a special folder where you can store your scripts. When you add an executable file to this folder, the file is added to the submenu. To run a script choose , then choose the script that you want to run from the submenu.
To run a script on a particular file, select the file in the view pane. Choose , then choose the script that you want to run on the file from the submenu. You can also select multiple files to run your scripts on.
To view the contents of your scripts folder, choose . The folder corresponds to the $GNOME_BASEDIR/.gnome2/nautilus-scripts directory.
I.7.6. Modifying the Appearance of Files and Folders
Nautilus enables you to modify the appearance of your files and folders in several ways, as described in the following sections.
I.7.6.1. To Add an Emblem to a File or Folder
You can add an emblem to an item in either of the following ways:
- Use the Properties dialog.
- Use the Backgrounds and Emblems dialog.
To add an emblem to an item with the properties dialog, perform the following steps:
-
Select the item to which you want to add an emblem.
Right-click on the item, then choose . A properties dialog is displayed.
-
Click on the Emblems tab to display the Emblems tabbed section, as shown in the following figure:
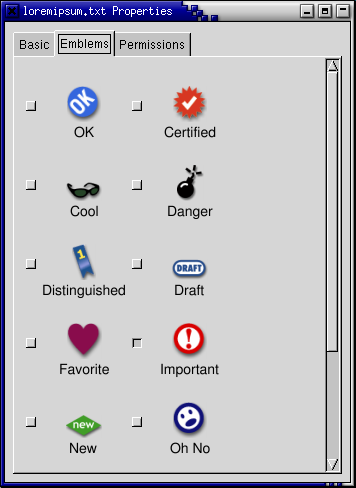
Select the emblem to add to the item.
Click to close the properties dialog.
To add an emblem to an item with the Backgrounds and Emblems dialog, perform the following steps:
- Choose . The Backgrounds and Emblems dialog is displayed.
- To display a list of emblems that you can add, click on the button.
- To add an emblem to an item, drag the emblem to the item.
- Click to close the dialog.
I.7.6.2. To Modify the Icon for a File or Folder
To change the icon that represents an individual file or folder, perform the following steps:
- Select the file or folder that you want to change.
- Choose . A properties dialog is displayed.
- On the Basic tabbed section, click on the button. A Select an icon dialog is displayed.
- Use the Select an icon dialog to choose the icon to represent the file or folder.
- Click to close the properties dialog.
To change the icon that represents a file type, use the File Types and Programs desktop preference tool. To open the File Types and Programs desktop preference tool, choose .
To restore an icon from a custom icon to the default icon specified in the File Types and Programs desktop preference tool, right-click on the icon then choose . Alternatively, click on the Remove Custom Icon button on the Properties dialog.
I.7.6.3. To Change the Size of Items in a View
You can change the size of items in a view. You change the size if the view displays a file or a folder. You can change the size of items in a view in the following ways:
- To enlarge the size of items in a view, choose .
- To reduce the size of items in a view, choose .
- To return items in a view to the normal size, choose .
You can also use the zoom buttons on the location bar to change the size of items in a view. Table I.7-6 describes how to use the zoom buttons.
| Button | Button Name | Description |
|---|---|---|
 |
button | Click on this button to reduce the size of items in a view. |
 |
button | Click on this button to return items in a view to normal size. |
 |
button | Click on this button to enlarge the size of items in a view. |
Nautilus remembers the size of items in a particular folder. The next time that you display the folder, the items are displayed in the size you selected. In other words, when you change the size of items in a folder, you customize the folder to display the items at that size. To return the size of the items to the default size specified in your preferences, choose .
I.7.6.4. Using Views to Display Your Files and Folders
Nautilus provides several ways to display the contents of your files. Nautilus includes viewer components that enable you to display particular types of file in the view pane. For example, you can use a web page viewer to display HTML files in the view pane. You can use a text viewer to view plain text files in the view pane.
You can also use Nautilus to open a file in an appropriate application. For more information, see Section I.7.3.4 ― Opening Files.
Nautilus includes views that enable you to display the contents of your folders in different ways. For example, you can display the contents of a folder in the following types of view:
-
Icon view
Displays the items in the folder as icons. Figure I.7-1 shows a folder displayed in icon view.
-
List view
Displays the items in the folder as a list. Figure I.7-3 shows a folder displayed in list view.
Use the View menu to choose how to display a file or folder. You can also use the View as drop-down list box to choose how to display a file or folder. When you display a folder, you can specify how you want to arrange or sort items in the folder. You can modify the size of the items in the view pane. The following sections describe how to work with icon view, list view, and views of files.
- I.7.6.4.1. To Choose a View in Which to Display a File or Folder
- I.7.6.4.2. To Arrange Your Files in Icon View
- I.7.6.4.3. To Stretch an Icon in Icon View
- I.7.6.4.4. To Modify the Behavior of a View
I.7.6.4.1. To Choose a View in Which to Display a File or Folder
Choose the type of view in which to display the contents of a file or folder from the View menu. Alternatively, to choose a view, choose . Select the view that you want to use from the View as Other dialog, then click on the button.
You can also choose the type of view from the View as drop-down list box. The View as drop-down list box is located at the right side of the location bar.
You can display different folders in different views. Nautilus remembers the view that you choose for a particular folder. The next time that you display the folder, Nautilus displays the folder in that view. In other words, when you choose a view for a folder, you customize the folder to always display in that view. To return the view for the folder to the default view specified in your preferences, choose .
I.7.6.4.2. To Arrange Your Files in Icon View
When you display the contents of a folder in icon view, you can specify how to arrange the items in the folder. To specify how to arrange items in icon view, choose . The submenu contains the following sections:
- The top section contains an option that enables you to arrange your files manually.
- The middle section contains options that enable you to sort your files automatically.
- The bottom section contains options that enable you to modify how your files are arranged.
Choose the appropriate options from the submenu, as described in the following table:
| Option | Description |
|---|---|
| Manually | Select this option to arrange the items manually. To arrange the items manually, drag the items to the location you require within the view pane. |
| By Name | Select this option to sort the items alphabetically by name. The order of the items is not case sensitive. If Nautilus is set to display hidden files, the hidden files are shown last. |
| By Size | Select this option to sort the items by size, with the largest item first. When you sort items by size, the folders are sorted by the number of items in the folder. The folders are not sorted by the total size of the items in the folder. |
| By Type | Select this option to sort the items alphabetically by object type. The items are sorted alphabetically by the description of their Multipurpose Internet Mail Extension (MIME) type in the File Types and Programs desktop preference tool. |
| By Modification Date | Select this option to sort the items by the date the items were last modified. The most recently modified item is first. |
| By Emblems | Select this option to sort the items by any emblems that are added to the items. The items are sorted alphabetically by emblem name. Items that do not have emblems are last. |
| Tighter Layout | Select this option to arrange the items so that the items are closer to each other. |
| Reversed Order | Select this option to reverse the order of the option by which you sort the items. For example, if you sort the items by name, select the Reversed Order option to sort the items in reverse alphabetical order. |
Nautilus remembers how you arrange the items in a particular folder. The next time that you display the folder, the items are arranged in the way that you selected. In other words, when you specify how to arrange the items in a folder, you customize the folder to display the items in that way. To return the arrangement settings of the folder to the default arrangement settings specified in your preferences, choose .
I.7.6.4.3. To Stretch an Icon in Icon View
In icon view, you can change the size of the icon that represents an item that is displayed. To change the size of an item in icon view, perform the following steps:
Right-click on the item that you want to resize, then choose . A rectangle appears around the item, with a handle at each corner.
-
Grab one of the handles, then drag the icon to the size that you want.
To return the icon to the original size, right-click on the icon, then choose .
You can also stretch icons on the desktop.
I.7.6.4.4. To Modify the Behavior of a View
You can modify the behavior of a view in the following ways:
- Specify that the view is the default view for a particular file or folder.
- Specify that the view is the default view for a file type or all folders.
- Specify that the view is an item in the View as drop-down list box for a particular file or folder.
- Specify that the view is an item in the View as drop-down list box for all of a particular file type or for all folders.
- Specify that the view is not an item in the View as drop-down list box for a particular file or folder.
To modify the behavior of a view perform the following steps:
-
Choose . A View as Other dialog is displayed, as shown in the following figure:
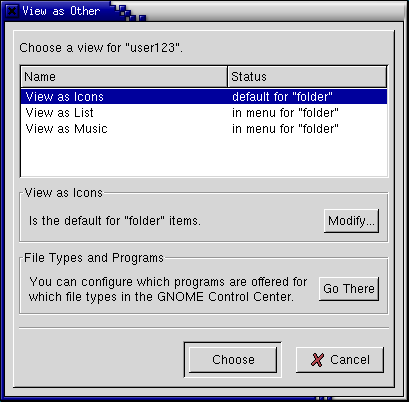
Select the view that you want to modify from the table in the dialog.
-
Click on the button. A Modify dialog is displayed. The following table describes the options on the Modify dialog:
Option Description Include in the menu for item_name items Select this option to include the view in the View as drop-down list box for this type of item. Use as default for item_name items Select this option to use the view as the default for this type of item. Include in the menu just for item_name Select this option to include the view in the View as drop-down list box for this item only. Use as default just for item_name Select this option to use the view as the default for this item only. Don't include in the menu for item_name items Select this option to exclude the view from the View as drop-down list box for this type of item. -
Click , then click to close the View as Other dialog.
You can also modify the actions that are associated with a file type in the File Types and Programs desktop preference tool. To open the File Types and Programs preference tool from the Open with Other or View as Other dialogs, click on the button.
I.7.7. Assigning Actions to Files
When you open a file, Nautilus performs the default action for that file type. The File Types and Programs desktop preference tool contains a table of file types, their associated file extensions, and their default actions. This table specifies what happens when you double-click on a file in Nautilus.
You can also use Nautilus to modify the actions that are associated with a particular file or file type.
You can use the File Types and Programs desktop preference tool to perform the following tasks:
- Specify the default action for a file type. You can also change the default action for a file type in Nautilus.
- Associate a file type with one or more applications. The default action might specify to open the file in an application that is associated with the file type.
- Associate a file type with one or more viewers. The default action might specify to open the file in a viewer that is associated with the file type.
- Associate a file extension with a MIME type. The MIME type specifies the format of the file so that Internet browsers and email applications can read the file.
For more information on the File Types and Programs desktop preference tool, see Section II.10.2 ― Configuring File Types and Programs.
- I.7.7.1. To Modify Actions
I.7.7.1. To Modify Actions
You can modify the actions associated with a file or file type. You can do the following:
- Specify that the action is the default action for a particular file.
- Specify that the action is the default action for a particular file type.
- Specify that the action is an item in the submenu for a particular file.
- Specify that the action is an item in the submenu for a particular file type.
- Specify that the action is not an item in the submenu for a particular file type.
To modify the actions associated with a file or file type, perform the following steps:
In the view pane, select the file for which you want to modify an action. If you want to modify an action associated with a file type, select a file of that type.
-
Choose . Perform either of the following steps:
- Choose . An Open with Other dialog is displayed.
- Choose . A View as Other dialog is displayed.
From the table in the dialog, select the application or viewer for which you want to modify the behavior.
-
Click on the button. A Modify dialog is displayed. The following table describes the options on the Modify dialog:
Option Description Include in the menu for file_type items Select this option to include the application or viewer in the submenu for this file type. Use as default for file_type items Select this option to use the application or viewer as the default action for this file type. Include in the menu just for filename Select this option to include the application or viewer in the submenu for this file, and not for other files of this type. Use as default just for filename Select this option to use the application or viewer as the default action for this file, and not for other files of this type. Don't include in the menu for file_type items Select this option to exclude the application or viewer from the submenu for this file type. Click , then click to close the dialog.
You can also modify the actions that are associated with a file type in the File Types and Programs desktop preference tool. To open the File Types and Programs preference tool from the Open with Other or View as Other dialogs, click on the button.
I.7.8. Customizing Nautilus
You can customize Nautilus to suit your requirements and preferences. This section describes how to customize Nautilus.
- I.7.8.1. Setting Your Preferences
- I.7.8.2. Changing Backgrounds
- I.7.8.3. To Show and Hide Window Components
I.7.8.1. Setting Your Preferences
Use the Preferences dialog to set preferences for the Nautilus windows and desktop. To display the Preferences dialog, choose .
You can set preferences in the following categories:
- The default settings for views.
- The appearance of the Nautilus windows and desktop.
- The behavior of the Nautilus windows and desktop.
- The behavior of items in icon views and list views.
- The information that is displayed in icon captions.
- Items that are displayed in the side pane.
- Home location and HTTP proxy details.
- Speed tradeoffs to improve the performance of Nautilus.
- I.7.8.1.1. To Set View Preferences
- I.7.8.1.2. To Set Font and Theme Preferences
- I.7.8.1.3. To Set Preferences for New Windows
- I.7.8.1.4. To Set Desktop Background and Trash Preferences
- I.7.8.1.5. To Set Icon and List Views Preferences
- I.7.8.1.6. To Set Icon Captions Preferences
- I.7.8.1.7. To Set Side Pane Preferences
- I.7.8.1.8. To Set Navigation Preferences
- I.7.8.1.9. To Set Speed Tradeoffs Preferences
I.7.8.1.1. To Set View Preferences
You can specify a default view, and default settings for icon views and list views. To specify your default view settings for Nautilus windows, choose . Choose View Defaults from the Preferences dialog.

Table I.7-7 lists the view settings that you can modify. The Preferences dialog contains an Icon View Defaults group box and a List View Defaults group box. The group boxes contain mostly the same dialog elements. Each dialog element is described once in Table I.7-7.
| Dialog Element | Description |
|---|---|
| View new folders using | Select the default view for folders. When you open a folder, the folder is displayed in the view that you select. |
| Arrange Items | Select the characteristic by which you want to sort the items in folders that are displayed in this view. |
| Default zoom level | Select the default zoom level for folders that are displayed in this view. The zoom level specifies the size of items in a view. |
| Sort in reversed order | Select this option if you want to reverse the order by which items are sorted in this view. If you select this option, the order of the characteristic you select in Layout items is reversed. For example, if you select By Name from the Layout items drop-down list box. You can select the Sort in reversed order option to sort the items in reverse alphabetical order. |
| Use tighter layout | Icon view only. Select this option to arrange the items so that the items in the folder are closer to each other. |
I.7.8.1.2. To Set Font and Theme Preferences
You can select the font that Nautilus uses in windows and the desktop background. Nautilus also includes themes that you can use to change the look-and-feel of the Nautilus windows and the desktop background.
To set your preferences for the font and theme of the Nautilus windows and desktop background, choose . Choose Appearance from the Preferences dialog.
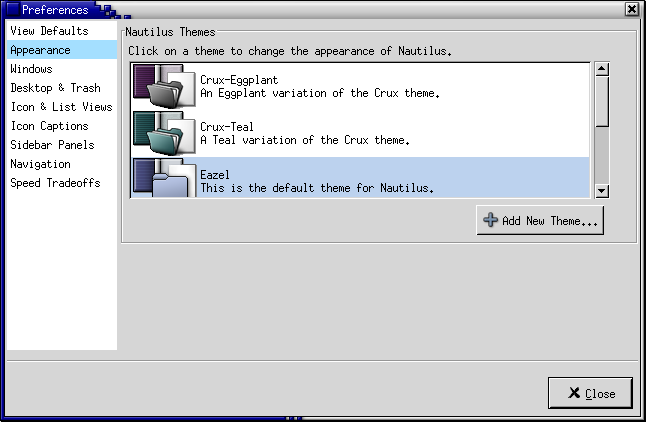
Table I.7-8 lists the font and theme settings that you can modify.
| Dialog Element | Description |
|---|---|
| Nautilus Themes | To change your Nautilus theme, choose a theme from the list. |
|
To add a new Nautilus theme, click on the button. A dialog is displayed. Use the dialog to find the new theme. Nautilus themes are stored as directories in the $GNOME_BASEDIR/share/pixmaps/nautilus/ directory. |
I.7.8.1.3. To Set Preferences for New Windows
To set your preferences for the Nautilus windows and desktop, choose . Choose Windows from the Preferences dialog.

Table I.7-9 lists the windows settings that you can modify.
| Option | Description |
|---|---|
| Open each file or folder in a separate window | Select this option to open a new window when you open a file or folder. |
| Display side bar in new windows | Select this option to display a side pane in new windows. |
| Display toolbar in new windows | Select this option to display a toolbar in new windows. |
| Display location bar in new windows | Select this option to display a location bar in new windows. |
| Display status bar in new windows | Select this option to display a statusbar in new windows. |
I.7.8.1.4. To Set Desktop Background and Trash Preferences
To set your preferences for the Nautilus desktop background and Trash, choose . Choose Desktop & Trash from the Preferences dialog.
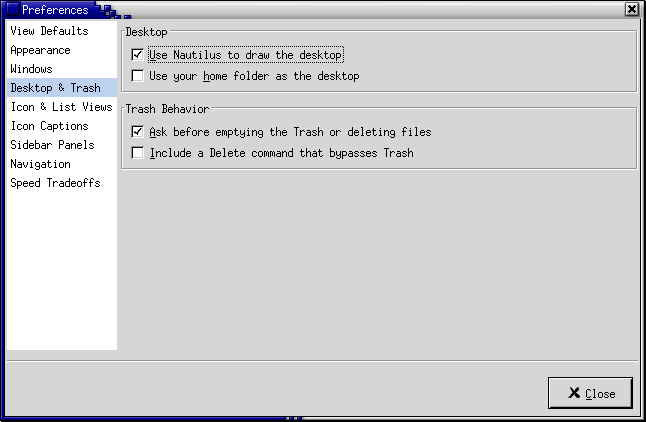
Table I.7-10 lists the desktop background and Trash settings that you can modify.
| Option | Description |
|---|---|
| Use Nautilus to draw the desktop |
Select this option to use Nautilus to manage your desktop. If you do not use Nautilus to manage your desktop, you can not do the following:
|
| Use your home folder as the desktop | Select this option to use your home directory as the desktop background directory, instead of the default desktop background directory, /.nautilus/desktop . If you select this option, the contents of your home directory are displayed as desktop background objects. |
| Ask before emptying the Trash | Select this option to display a confirmation message before Trash is emptied. |
| Include a Delete command that bypasses Trash |
Select this option to add a menu item to the following menus:
When you select an item then choose the menu item, the item is deleted from your file system immediately. |
I.7.8.1.5. To Set Icon and List Views Preferences
To set your preferences for items in icon views and list views, choose . Choose Icon & List Views from the Preferences dialog.
Table I.7-11 lists the settings that you can modify for items in icon views and list views.
| Option | Description |
|---|---|
| Activate items with a single click | Select this option to perform the default action for an item when you click on the item. When this option is selected, and you point to an item, the title of the item is underlined. |
| Activate items with a double click | Select this option to perform the default action for an item when you double-click on the item. |
| Execute files when they are clicked | Select this option to run an executable file when you choose the executable file. An executable file is a text file that can execute, that is, a shell script. |
| Display files when they are clicked | Select this option to display the contents of an executable file when you choose the executable file. |
| Ask each time | Select this option to display a dialog when you choose an executable file. The dialog asks whether you want to execute the file or display the file. |
| Show hidden files | Select this option to display hidden files in the view pane. The first character in a hidden file name is a period (.). |
| Show backup files | Select this option to display backup files in the view pane. The last character in a backup file name is a tilde (~). |
| Show special flags in Properties window |
Select this option to show the following special flags in the Permissions tab on a properties dialog:
|
| Always list folders before files | Select this option to list folders before files. |
I.7.8.1.6. To Set Icon Captions Preferences
An icon caption displays the name of a file or folder in an icon view. The icon caption also includes three additional items of information on the file or folder. The additional information is displayed after the file name. Normally only one item of information is visible, but when you zoom in on an icon, more of the information is displayed. You can modify what additional information is displayed in icon captions.
To set your preferences for icon captions, choose . Choose Icon Captions from the Preferences dialog.

Select the items of information that you want to display in the icon caption from the three drop-down list boxes. Select the first item from the first drop-down list box, select the second item from the second drop-down list box, and so on. The following table describes the items of information that you can select:
| Information | Description |
|---|---|
| Size | Choose this option to display the size of the item. |
| Type | Choose this option to display the description of the MIME type of the item from the File Types and Programs desktop preference tool. |
| Date modified | Choose this option to display the last modification date of the item. |
| Date changed | Choose this option to display the last modification date of the inode of the item. An inode is a data structure that contains information about individual files in UNIX file systems. Each file has one inode. An inode contains the node, type, owner, and location of a file. |
| Date accessed | Choose this option to display the date that the item was last accessed. |
| Owner | Choose this option to display the owner of the item. |
| Group | Choose this option to display the group to which the owner of the item belongs. |
| Permissions | Choose this option to display the permissions of the item as three sets of three characters, for example -rwxrw-r--. |
| Octal permissions | Choose this option to display the permissions of the item in octal notation, for example 764. |
| MIME type | Choose this option to display the MIME type of the item. |
| None | Choose this option to display no information for the item. |
I.7.8.1.7. To Set Side Pane Preferences
To set your preferences for the side pane, choose . Choose Sidebar Panels from the Preferences dialog.

Table I.7-12 lists the side pane settings that you can modify.
| Option | Description |
|---|---|
| Display History tab in sidebar | Select this option to display the History tab in the side pane. |
| Display Notes tab in sidebar | Select this option to display the Notes tab in the side pane. |
| Display Tree tab in sidebar | Select this option to display the Tree tab in the side pane. |
| Show only folders (no files) in the tree | Select this option to display only folders in the Tree tabbed pane. |
I.7.8.1.8. To Set Navigation Preferences
To set navigation preferences, choose . Choose Navigation from the Preferences dialog.
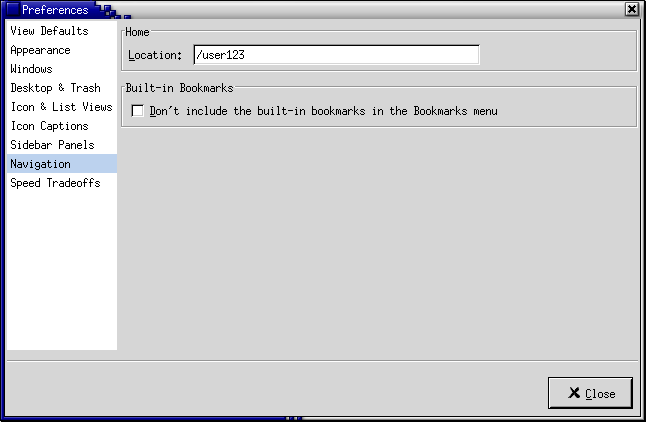
Table I.7-13 lists the navigation settings that you can modify.
| Dialog Element | Description |
|---|---|
| Home Location |
Enter the location that you want to use as your home page. Enter your home location as follows:
|
| Don't include the built-in bookmarks in the Bookmarks menu | Select this option to exclude the default bookmarks that are supplied with Nautilus from the menu. |
I.7.8.1.9. To Set Speed Tradeoffs Preferences
Some Nautilus features can affect the speed with which Nautilus responds to your requests. You can modify the behavior of some of these features to improve the speed of Nautilus. In this way, you can exchange, or trade off, a Nautilus feature for better performance. For each of the speed tradeoff preferences, you can select one of the options described in the following table:
| Option | Description |
|---|---|
| Always | Performs the action for both local files, and files on other file systems. |
| Local Files Only | Performs the action for local files only. |
| Never | Never performs the action. |
To set your speed tradeoff preferences, choose . Choose Speed Tradeoffs from the Preferences dialog.
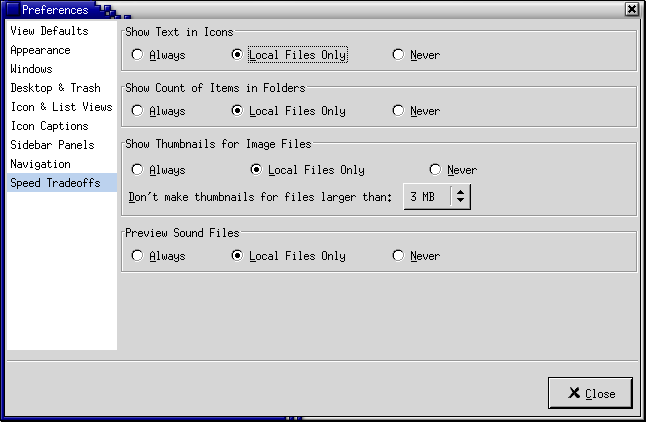
Table I.7-14 lists the speed tradeoff settings that you can modify.
| Dialog Element | Description |
|---|---|
| Show Text in Icons | Select an option to specify when to preview the content of text files in the icon that represents the file. |
| Show Count of Items in Folders | Select an option to specify when to show the number of items in folders. |
| Show Thumbnails for Image Files |
Select an option to specify when to show thumbnails of image files. Nautilus stores the thumbnail files for each folder in a .thumbnails directory that is one level below the folder. Don't make thumbnails for files larger than: Specify the maximum file size for files for which Nautilus creates a thumbnail. |
| Preview Sound Files | Select an option to specify when to preview sound files. |
I.7.8.2. Changing Backgrounds
Nautilus includes backgrounds that you can use to change the look-and-feel of the following screen components:
- Nautilus desktop background
- Side pane
- View pane
- Panels, except for the Menu Panel
To change the background of a screen component perform the following steps:
- Choose . The Backgrounds and Emblems dialog is displayed.
- To display a list of patterns that you can use on the background, click on the button. To display a list of the colors that you can use on the background, click on the button.
- To change the background to a pattern, drag the pattern to the screen component. To change the background to a color, drag the color to the screen component.
- Click to close the dialog.
When you change the background of the side pane or the view pane of a particular folder, Nautilus remembers the background that you chose. The next time that you display the folder, the background that you selected is displayed. In other words, when you change the background of a folder, you customize the folder to display the background.
- I.7.8.2.1. To Add a Pattern
- I.7.8.2.2. To Add a Color
I.7.8.2.1. To Add a Pattern
To add a pattern to the patterns that you can use on your screen components, choose . Click on the button, then click on the button. A dialog is displayed. Use the dialog to find the new pattern. Click to add the new pattern to the Backgrounds and Emblems dialog.
I.7.8.2.2. To Add a Color
To add a color to the colors that you can use on your screen components, choose . Click on the button, then click on the button. A color selector dialog is displayed. Use the color wheel or the sliders to choose the color. Click to add the new color to the Backgrounds and Emblems dialog.
I.7.8.3. To Show and Hide Window Components
You can show and hide Nautilus window components as follows:
- To hide the side pane, choose . To display the side pane again, choose .
- To hide the toolbar, choose . To display the toolbar again, choose .
- To hide the location bar, choose . To display the location bar again, choose .
- To hide the statusbar, choose . To display the statusbar again, choose .
- To remove a tab from the side pane, right-click in the side pane. Choose the tab that you want to remove from the popup menu. To add the tab to the side pane again, choose the tab from the popup menu again.