Working With Windows
The information in this chapter describes how to use windows in the desktop. You can use several types of window manager with the GNOME desktop, for example, Metacity and Sawfish. Many of the functions in Metacity are also available in Sawfish. This chapter describes the functions that are associated with the Metacity window manager.
- I.6.1. Windows and Workspaces
- I.6.2. Types of Window
- I.6.3. Menus and Applets for Working With Windows and Workspaces
- I.6.4. Manipulating Windows
- I.6.5. Manipulating Workspaces
I.6.1. Windows and Workspaces
You can display many windows at the same time on your desktop. Your windows are displayed in subdivisions of your desktop that are called workspaces. A workspace is a discrete area on the desktop in which you can work. Every workspace on the desktop contains the same desktop background, the same panels, and the same menus. However, you can run different applications, and open different windows in each workspace. You can display only one workspace at a time on your desktop but you can have windows open in other workspaces.
The Workspace Switcher applet displays a visual representation of your windows and workspaces, as show in Figure I.6-1.

By default, your desktop contains four workspaces. You can add more workspaces at any time. To add workspaces to your desktop, right-click on the Workspace Switcher applet, then choose from the applet popup menu. The Workspace Switcher Preferences dialog is displayed. Use the Number of workspaces spin box to specify the number of workspaces you require.
- I.6.1.1. Window Manager Behavior
I.6.1.1. Window Manager Behavior
A window manager controls how windows appear and behave on your desktop. The window manager manages where your windows are located, which window has focus, and the style of the frame on the windows. The window frame contains buttons that enable you to perform standard actions such as moving, closing, and resizing windows.
You can configure window manager settings in the Window Behavior preference tool. This manual describes the functions that are associated with the default configuration of the Window Behavior window manager. The default configuration is specified in the Metacity preference tools. This manual also describes the default functions of the Crux theme.
I.6.2. Types of Window
The desktop features the following types of windows:
-
Application windows
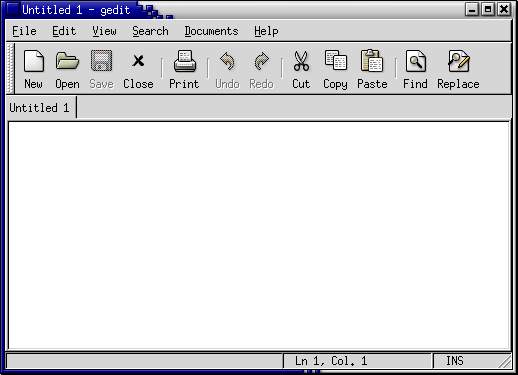
When you start an application, an application window opens. The window manager applies a frame to the application window. By default, the top edge of the application window contains a titlebar with buttons that you can use to work with the window. The buttons in an application window frame enable you to perform actions such as open the , or close the window. The provides a number of actions that you can perform on the window.
The following figure shows a typical application window.
-
Dialog windows
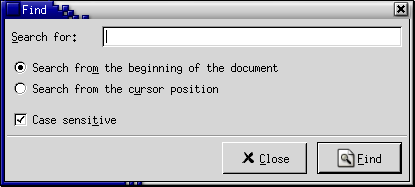
A dialog window is a popup window in which you enter information or commands. The dialog appears within a window frame. The frame of a dialog window contains buttons that enable you to open the , or to close the dialog window.
You can use the top edge of the frame to work with the window. For example, you can use the titlebar to move the dialog around the desktop. The frame also contains buttons that enable you to do the following:
- Open the
- Close the dialog window
Typically, you open a dialog window from an application window. When you open a dialog window, the window is usually raised and has focus. Some dialog windows do not allow you to use the application until you close the dialog.
The following figure shows a typical dialog window.
- I.6.2.1. Window Frames
I.6.2.1. Window Frames
A window frame is a border around a window. The window frame contains a titlebar. The titlebar normally contains buttons that you can use to work with the window.
- I.6.2.1.1. Themes
- I.6.2.1.2. Control Elements
I.6.2.1.1. Themes
You can apply several themes to your window frames. The theme determines how the frame looks. To choose a theme for all your window frames, choose .
The default theme is Crux. This manual describes the functions that are associated with the Crux theme.
I.6.2.1.2. Control Elements
You can use the window frame to perform various actions with the window. In particular, the titlebar contains various active control elements. The following figure shows the titlebar of an application window:
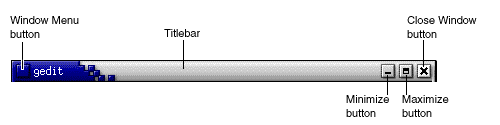
Dialog windows also contain some of the window frame control elements. Table I.6-1 describes the active control elements on window frames, from left to right.
| Control Element | Description |
|---|---|
| button | Click on the button to open the . |
| Titlebar |
You can use the titlebar to perform the following actions:
|
| button | Click on the button to minimize the window. |
| button | Click on the button to maximize the window. |
| button | Click on the button to close the window. |
| Border |
The border around the window. Use the border to perform the following actions:
|
| Window contents |
The area inside the window frame. Use the window contents to perform the following actions:
|
I.6.3. Menus and Applets for Working With Windows and Workspaces
This section describes the menus and applets that you can use to work with windows and workspaces.
- I.6.3.1. Window Menu
- I.6.3.2. Window List Applet
- I.6.3.3. Workspace Switcher Applet
- I.6.3.4. Using the Menu Panel to Work With Windows
I.6.3.1. Window Menu
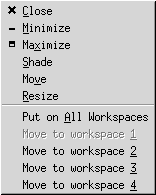
The is a menu of commands that you can use to perform actions on your windows. To open the perform one of the following actions:
- Click on the button on the window that you want to work with.
- Press Alt+spacebar.
- Press-and-hold Alt, then right-click on any part of the window that you want to work with.
Table I.6-2 describes the commands and submenus in the .
| Menu Item | Function |
|---|---|
| Closes the window. | |
| Minimizes the window. | |
| or | Maximizes the window. If the window is already maximized, choose to restore the window to its previous size. |
| or | Shades the window. If the window is already shaded, choose to restore the window to its previous size. |
| Enables you to use the arrow keys to move the window. | |
| Enables you to use the arrow keys to resize the window. | |
| or | Puts the window on all of your workspaces. If the window is already on all of your workspaces, choose to put on the current workspace only. |
| or | Moves the window to the workspace that you choose. If the window is on all of your workspaces, choose to put the window on the workspace that you want. |
I.6.3.2. Window List Applet
Window List displays a button for each window that is open. You can use the Window List to perform the following tasks:
-
To minimize a window
Click on the button that represents the window.
-
To restore a minimized window
Click on the button that represents the window.
-
To give focus to a window
Click on the button that represents the window.
When you open a window, Window List displays a button that represents the window. The window list buttons show which windows are open. You can view which windows are open even if some windows are minimized, or other windows overlap a window. Window List can display buttons for the windows in your current workspace, or in all workspaces. To select this option, you must change the preferences of Window List.
You can also right-click on a window list button to open the for the window that the button represents. When you open the from Window List, the does not contain the workspace commands. For more information on the commands, see Section I.6.3.1 ― Window Menu.
Figure I.6-2 shows Window List when the following windows are open:
- gedit
- Dictionary
- GHex
- GNOME Terminal

The buttons in the applet show the status of your windows. Table I.6-3 explains the information that the window list buttons provide about the window. The examples in Table I.6-3 refer to Figure I.6-2.
| State | Indicates | Example |
|---|---|---|
| Button is pressed in. | The window has focus. | gedit |
| Square brackets around window title. | The window is minimized. | Dictionary |
| Button is not pressed in, no square brackets around title. | The window is displayed on the desktop, and is not minimized. | ghex |
| Numeral on button, in parentheses. | The button represents a group of buttons. | Gnome-terminal (3) |
- I.6.3.2.1. Grouping Buttons
I.6.3.2.1. Grouping Buttons
If the space on a panel is limited, Window List can group the buttons that represent windows in the same class under one window list button. The button in Figure I.6-2 is an example of a button that represents a group of buttons. The following figure shows an example of Window List with a button group open:

To open a list of the windows in a group, click on the window list button that represents the group. You can click on the items in the list to give focus to windows, minimize windows, and restore windows.
To open the for a window in a button group, right-click on the window list button that represents the group. A list of the windows in the group is displayed. To open the for a window in the group, click on the item in the list. When you open the from the Window List , the does not contain the workspace commands. For more information on the commands, see Section I.6.3.1 ― Window Menu.
I.6.3.3. Workspace Switcher Applet
Workspace Switcher displays a visual representation of your workspaces, as shown in Figure I.6-3. Figure I.6-3 shows the applet when the GNOME session contains four workspaces. Your workspaces appear as buttons on the applet. The background of the button in the applet that represents the current workspace is highlighted. The current workspace in Figure I.6-3 is the workspace at the left of the applet. To switch to another workspace, click on the workspace in the applet.
Workspace Switcher also displays the application windows and dialogs that are open in your workspaces.
The applet displays the workspaces in order from left to right across the rows of the applet. In Figure I.6-3, the applet is set up to display the workspaces in one row. You can specify the number of rows in which your workspaces are displayed in Workspace Switcher . You can also change the default behavior of the applet to display the names of your workspaces in the applet.
I.6.3.4. Using the Menu Panel to Work With Windows
From the Menu Panel, you can view a list of all windows that are currently open. You can also choose a window to give focus to. To view the window list, click on the icon at the extreme right of the Menu Panel. The following figure shows an example of the window list that is displayed from the Menu Panel:
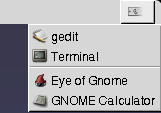
When the focus changes, the icon that you click on to display the window list changes. The icon represents the window that currently has focus. To give focus to a window, choose that window from the window list.
The window list lists the windows in all workspaces. The windows in all workspaces other than the current workspace, are listed under a separator line.
You cannot move the icon at the extreme right of the Menu Panel.
I.6.4. Manipulating Windows
This section describes how to manipulate windows.
- I.6.4.1. To Give Focus to a Window
- I.6.4.2. To Minimize a Window
- I.6.4.3. To Maximize a Window
- I.6.4.4. To Restore a Window
- I.6.4.5. To Close a Window
- I.6.4.6. To Resize a Window
- I.6.4.7. To Move a Window
- I.6.4.8. To Shade a Window
- I.6.4.9. To Put a Window on All Workspaces
- I.6.4.10. To Move a Window to Another Workspace
I.6.4.1. To Give Focus to a Window
A window that has focus can receive input from the mouse and the keyboard. Only one window can have focus at a time. The window that has focus has a different appearance than other windows.
You can use the following elements to give focus to a window:
| Element | Action |
|---|---|
| Mouse | Click on the window, if the window is visible. |
| Shortcut key | Switch between the windows that are open with a shortcut key. To give focus to a window, release the keys. The default shortcut key to switch between windows is Alt+Tab. |
| Window List | Click on the button that represents the window in Window List . |
| Workspace Switcher | Click on the window that you want to give focus to in the Workspace Switcher display. If you click on a window in another workspace, Workspace Switcher switches to the new workspace, and gives focus to the window. |
| Menu Panel | Click on the icon at the extreme right of the Menu Panel. A list of your open windows is displayed. Choose the window from the list. |
I.6.4.2. To Minimize a Window
To minimize a window perform one of the following actions:
- Click on the button on the window frame.
- Open the , then choose .
- If the window has focus, click on the button that represents the window in Window List. If the window does not have focus, click twice on the button that represents the window.
- Right-click on the button that represents the window in Window List, then choose from the popup menu.
I.6.4.3. To Maximize a Window
When you maximize a window, the window expands as much as possible. To maximize a window perform one of the following actions:
- To maximize the window, click on the button on the window frame. Alternatively, open the , then choose .
- Right-click on the button that represents the window in Window List, then choose from the .
I.6.4.4. To Restore a Window
To restore a maximized window perform one of the following actions:
- Click on the button on the window frame.
- Open the . Choose .
- Right-click on the button that represents the window in Window List to open the . Choose .
To restore a minimized window, click on the button that represents the window in Window List.
I.6.4.5. To Close a Window
To close a window perform one of the following actions:
- Click on the button on the window frame.
- Open the . Choose .
- Right-click on the button that represents the window in Window List, then choose from the .
If you have unsaved data in the window, you are prompted to save your data.
I.6.4.6. To Resize a Window
To resize a window perform one of the following actions:
To resize a window vertically and horizontally point to a corner of the window. The mouse pointer changes to indicate that you can resize the window. Grab the corner and drag the window to the new size.
To resize a window vertically or horizontally, right-click on the button that represents the window in Window List. Choose from the . Use the arrow keys to resize the window.
To resize a window horizontally point to one of the vertical edges of the window. The mouse pointer changes to indicate that you can resize the window. Grab the edge and drag the window to the new size.
To resize a window vertically point to the bottom edge of the window. The mouse pointer changes to indicate that you can resize the window. Grab the edge and drag the window to the new size.
-
To resize a window, press-and-hold Alt, then middle-click near the corner you want to resize. The mouse pointer changes to indicate that you can resize from the corner. To resize the window, drag from the corner on which you middle-clicked.
You cannot resize some dialog windows. Also, some application windows have a minimum size below which you cannot reduce the window.
I.6.4.7. To Move a Window
To move a window perform one of the following actions:
- Grab the titlebar of the window and drag the window to the new location.
- Press-and-hold Alt then drag the window to the new location.
- Open the , then choose . Use the arrow keys to move the window to the new location.
- Right-click on the button that represents the window in Window List, then choose from the . Use the arrow keys to move the window to the new location.
I.6.4.8. To Shade a Window
You can shade and unshade windows as follows:
| Shade | Reduce the window so that only the titlebar is visible. |
| Unshade | Switch a window from a shaded state so that the full window is displayed. |
To shade a window perform one of the following actions:
- Double-click on the titlebar of the window. To unshade the window, double-click on the titlebar again.
- Open the . Choose . To unshade the window, choose .
- Right-click on the button that represents the window in Window List, then choose from the . To unshade the window, choose .
I.6.5. Manipulating Workspaces
This section describes how to manipulate workspaces.
- I.6.5.1. To Switch Between Workspaces
- I.6.5.2. To Add Workspaces
- I.6.5.3. To Name Workspaces
- I.6.5.4. To Delete Workspaces
I.6.5.1. To Switch Between Workspaces
You can switch between workspaces in any of the following ways:
-
Use Workspace Switcher
Click on the workspace that you want to switch to in Workspace Switcher.
-
Use a shortcut key
The default shortcut keys to switch between the workspaces are as follows:
Shortcut Key Function Ctrl+Alt+right arrow Selects the workspace to the right. Ctrl+Alt+left arrow Selects the workspace to the left.
I.6.5.2. To Add Workspaces
To add workspaces to your desktop, right-click on Workspace Switcher, then choose from the applet popup menu. The Workspace Switcher Preferences dialog is displayed. Use the Number of workspaces spin box to specify the number of workspaces you require. Workspace Switcher adds new workspaces at the end of the workspace list.
I.6.5.3. To Name Workspaces
The default names of your workspaces are Workspace 1, Workspace 2, Workspace 3, and so on. You can assign names to your workspaces in the Workspaces desktop preference tool.
To assign names to your workspaces, right-click on Workspace Switcher, then choose from the applet popup menu. The Workspace Switcher Preferences dialog is displayed. Use the Workspaces list box to specify the names of your workspaces. Select a workspace, then type the new name for the workspace.
I.6.5.4. To Delete Workspaces
When you delete a workspace the windows in the workspace are moved to another workspace, and the empty workspace is deleted.
To delete workspaces from your desktop, right-click on Workspace Switcher, then choose from the applet popup menu. The Workspace Switcher Preferences dialog is displayed. Use the Number of workspaces spin box to specify the number of workspaces you require. Workspace Switcher deletes workspaces from the end of the workspace list.