January 2004, Issue 98 Published by Linux Journal
Front Page | Back Issues | FAQ | MirrorsThe Answer Gang knowledge base (your Linux questions here!)
Search (www.linuxgazette.com)

TAG Editor: Heather Stern
Senior Contributing Editor: Jim Dennis
Contributing Editors: Ben Okopnik, Dan Wilder, Don Marti
![[tm]](../gx/tm.gif) ,
http://www.linuxgazette.com/
,
http://www.linuxgazette.com/
|
...making Linux just a little more fun! |
By Dave Sirof |
![[BIO]](../gx/2002/note.png) None provided.
None provided.
|
...making Linux just a little more fun! |
By Javier Malonda |
These images are scaled down to minimize horizontal scrolling. To see a panel in all its clarity, click on it.
![[cartoon]](ecol-136-e.png)
![[cartoon]](ecol-137-e.png)
![[cartoon]](ecol-139-e-as.png)
All Ecol cartoons are at tira.escomposlinux.org (Spanish), comic.escomposlinux.org (English) and http://tira.puntbarra.com/ (Catalan). The Catalan version is translated by the people who run the site; only a few episodes are currently available.
These cartoons are copyright Javier Malonda. They may be copied, linked or distributed by any means. However, you may not distribute modifications. If you link to a cartoon, please notify Javier, who would appreciate hearing from you.
|
...making Linux just a little more fun! |
By Phil Hughes |
What I mean by work with the xml is to use standard XML tools to format the data for output. I had never done this before but I knew an important buzzword which is XSLT which stands for XML Stylesheet Language Transformations. This is a language designed to define transformations from XML to other formats. So, I started reading. Typically, XSLT is used to transform XML into HTML but there is no restriction on what you can do with it so I decided to give it a try.
But, I still needed two more pieces: what to transform it into and, as there would be some program logic involved to place the cards on the page in the right place, some general-purpose programming language. After considering the various programming language alternatives--Python being the one that sounded best--I realized that if I just generated PostScript then I could let the printer itself deal with the placement issues. Strange but, I figured, why not.
Having picked PostScript, I sat down to actually decide how to place the cards on the page. Flashcards need to be double-sided and, at first, I thought of printing one side and then running the card stock back thru the printer to do the other side. This is a logical nightmare as it is easy to get the paper in the printer wrong, have a registration problem or get out of order because of a printer jam.
I decided on an alternative approach which involves another high-tech device called a glue stick. The idea is to print the front and back of each card on the front of one page which you then fold in half, glue together and cut into the actual cards. The double layer of paper and the glue will make the cards heavy enough to work with.
At this point, it is time for a confession. This is not a beautiful, finished production system. What it is is something that works and a proof of concept. For a production environment, it is important to define card sizes and fonts in a configuration file. In addition, the message for each side is currently printed in a single line without consideration of size. Line folding needs to be implemented.
Ok, back to work. I picked a 1.5 x 2.5 inch card size which makes it possible to get nine cards--both front and back--on one side of letter-sized paper. There are 1 inch top and bottom margins and .5 inch left and right margins. In order to make folding and cutting easy, I want to print a fold line down the middle of the page (between the front sides and the back sides) and cut marks for the edges of the cards. With this fold, the printing on the back is upside down from the printing on the front. After considering this I decided it wasn't important--it just defined which way to turn over the card when using them.
Everything (that is, the PostScript and the the XSL) is all in one file which you can download here. You can just ignore the XML stuff for now; note that if you try to display this in your browser, it will not display correctly because of the XML. You can see the sample output here.
If you have never worked in PostScript, get ready. PostScript is an RPN (Reverse Polish Notation) language. If you have ever used an HP calculator you will know what I am talking about. If not, the quick explanation is that you do things by putting items on a stack and then operating on that stack. For example, to add two numbers, you place the numbers on the stack and then execute the add operator which fetches the numbers, adds them and puts the result back on the stack. Note that I hate RPN languages. :-)
Disclaimer aside, PostScript is actually a very clean language and not a bad language to do the work we need to do. The way you work with PostScript is you describe everything you want to put on a page--characters, lines, filled-in areas and such--and then you tell it to print the page. That means that we don't have to remember a lot of stuff and then work down the page sequentially--we just move around and put what we want on the page.
In PostScript the basic unit of length is 1/72 of an inch. Personally, I an not very excited about working in such units so I defined a function called inch which takes the current value on the stack, multiplies it by 72 and puts the value back on the stack.
/inch { 72 mul } def
This way, I just add the word inch after a number and it gets
multiplied by 72.
If you look at the cutmarks function, you will see a whole bunch of
moveto and lineto statements. As you might
expect, these operators take two values off the stack (an x and a y
coordinate where the 0,0 is the lower left corner of the page and a
positive move in to the right or up) and
either move the current location to the specified coordinates or draw a
line from the current location to the specified location.
Going down to the startit function, you can see all the
setup work for the page. I define three, 9-element arrays, x, yf
and yb which contain the x and y coordinates (yf for front, yb for back)
of where to place the text for each of the nine cards. (Note that arrays
in PostScript are indexed starting at 0.) The other two initialization
steps are to define the font and font size to be used for the text and
to set the card number counter cardno to 0.
Two other utility functions are defined, cardstep and
pageout. pageout checks the current card
number and if it is greater than 0, draws the cutmarks (by calling the
cutmarks function and then prints the page using the
showpage builtin.
cardstep increments the card counter and then, if it is
greater than 8, calls pageout to print the page and then
resets cardno to 0 to prepare for the next page.
The last two functions are front and back.
They move to the correct location on the page by indexing into the
location arrays and then print the top value on the stack using the
show builtin. The back function then calls
cardstep to move along to the next position. Thus, the
following two lines would print a card:
(Front Side) front
(Back Side) back
I said two lines but the spacing isn't important in PostScript. You would get the same result of this information was on one line. The parenthesis are used to delineate the string which is being placed on the stack..
All of the lines starting with a slash (/) have just defined functions.
The real program starts with the line startit which calls
the startit initialization function. Next, a series of calls to front
and back must be input finally followed by a call to
pageout to output the last page if there are any cards on it.
I tested the PostScript with some sample data and it worked fine. So, on to the next part which is translating the XML from FlashKard into what is needed to drive the PostScript code. Two pieces are needed here, the XSL that I have to write and a program to read the XSL and the XML files from FlashKard and then output the PostScript to send to the printer.
The easy part was the program. xsltproc is exactly this program. One down. On to writing something in a language I have never seen before. But, could it be worse than writing in an RPN language?
As it turns out, there really isn't much to do. After some XSL
boilerplate (<xsl:stylesheet ... > I needed to
define the output format to be text as HTML is the default. What text
means is "anything else". This is done with
<xsl:output method="text">
The first thing I want to output is the PostScript program itself.
This is done by including it immediately after a <xsl:template
match="/"> tag. The match of / matches the whole XML so it is
processed at the start of the file. Note that I have put the
%!PS on the same line as the xsl tag. This is necessary so
that the printer will see this as the beginning of the first line
of data. Otherwise the print spooler will think this is just text and
print the PostScript rather than it being interpreted.
There is one other XSL tag before the matching
</xsl:template> tag which is
<xsl:apply-templates/>.
This tells xsltproc that any other matching templates are to be applied
here.
There is one other template with a match expression of
match="e". This matches the block describing an individual
card. This is explained in a comment to the FlashKard article.
Within that block is an o block for the original language
entry and a t block for the translation. Using the
value-of feature, I grab these values, put them in
parenthesis and follow them by either front or back.
That's it folks. Assuming the XSL in in ks.xsl,
entering the command
xsltproc ks.xsl creatures.kvtml | lprwill give you your first set of flashcards.
As I mentioned before, this is a proof of concept. Generalizing the PostScript, dealing with line folding and writing a shell scropt wrapper for this command line would clean things up and make a useful program.
Phil Hughes, Group Publisher of SSC, likes to get his hands dirty every now and then. But, you won't find him driving a car with an automatic transmission or using Emacs.
Phil Hughes is the publisher of Linux Journal, and thereby Linux Gazette. He dreams of permanently tele-commuting from his home on the Pacific coast of the Olympic Peninsula. As an employer, he is "Vicious, Evil, Mean, & Nasty, but kind of mellow" as a boss should be.
|
...making Linux just a little more fun! |
By Phil Hughes |
Before I get carried away, let me get those unfamiliar with troff up to speed. troff is a program that was developed at AT&T Bell Labs that really made UNIX and, thus, Linux possible. UNIX, like Linux, started as a hobby project. But, back in 1970 you didn't go to the local supermarket and buy a computer to run UNIX on. You actually needed someone with a house-sized chunk of change to even think about running a UNIX system.
While UNIX was fun for a while, to have a future it needed to actually do something useful for the company that was paying that house-sized chunk of change. It turns out that troff was the magic application.
At Bell Labs, like virtually everywhere, phototypesetting was done by someone sitting down at a keyboard of a typesetter and, well, typing. The output was film or photographic paper and changes were usually made through careful use of an Xacto knife. There had to be a better way. It turned out the better way was a UNIX system, troff and the Graphic Systems CAT phototypesetter.
For most of us with a laser printer next to us, this sounds pretty obvious but you couldn't buy a laser printer at the drugstore either in those days. This system consisted of a slow input device such as a ten character per second teletype, a computer running a text editor which allowed you to enter text with some basic markup commands, another program that would read the markup and produce what the typesetter needed to see and, finally, a phototpyesetter that talked to the computer.
The computer was a PDP-11, the editor was ed and the program to drive the phototypesetter was troff. The CAT phototypesetter was specifically designed to talk to this PDP-11/UNIX/troff combo. It's only input method was an RS-232 cable.
Over the years troff has evolved. It's two-character commands have been expanded, its ability to support more than four fonts as the same time is long gone (that was a limitation of the CAT--the fonts were on film strips) and its ability to produce output for different devices has grown. The most common output format for years has been PostScript. If you have a PostScript printer you can output to it directly. If not, you can use GhostScript to perform the translation.
The problem is, with almost everything getting published on the Web, having information in PostScript is not the real answer. You need HTML. Well, troff now supports HTML as an output format.
Is this a big deal? Well, to start with, all the manual pages for the commands on your Linux system are written in troff using the man macros. If you want one of those pages in HTML all you need to do is run groff (the troff frontend program) and tell it you want HTML output. So, there are the first few thousand reasons. There are more.
Many books have been written in troff including all that work done at Bell Labs long ago. Many companies that relied on UNIX systems internally also did internal documentation using troff. And, well, for those of us who are still crazy, writing in troff isn't that bad.
A good place to start would be to test it out on a man page. Generally man pages are stored in subdirectories of /usr/share/man in a compressed format. The subdirectory man1 will have all the man pages for commands. Try:
  cd /usr/share/man/man1
  ls
It is likely you will see a huge list of files with names such as ln.1.gz. This particular file is the man page for the ln command (the 1 indicates section one, commands) and the gz indicates that it is compressed. The good news is that we don't have to save the decompressed version to work with it as groff will read from standard input. Try
zcat ln.1.gz | groff -man -Thtml > /tmp/ln.html
If all goes well, you will have the HTML version of the ln man page in the file /tmp/ln.html. Point your browser at it and take a look.
Let me explain the pieces of the above command line.
If you got this far you must think there is something useful going on with troff. So, let's take a quick look at what the input looks like. Because the above example uses the man macro package, it is not really an easy starting point. So, instead, here is a very basic troff program to show the basic concepts. pre> .sp .5i .po .5i .ft HB .ps 24 .ce 1 Simple Test File .sp .2i .ps 11 .vs 13 .ft R This is the beginning of some simple text. As troff defaults to filling lines, a sentence per line makes editing easier. This all ends up in a \fIparagraph\fP will automatically filled and justified lines. .sp The .sp command can be used to create a blank line. With no argument, the value of the vertical spacing (.vs) is used.
As you can see, troff commands start with a dot and are two letters long. (Longer command names are supported in newer versions.) Here is what is happening:
If you saved this file in test1, you can see the output by running the following command:
groff test1 | gv -
As you can see above, there is a lot of control but it requires a lot of obscure commands. If you write a lot of documents in the same basic format, you can get pretty sick of setting page offsets and font sizes. You may also want to change to indented paragraphs, have footnotes and create a table of contents. That is where macro packages come in.
ou can think of the basic troff engine as working like one of those old Etch-a-Sketch kids toys with the addition of having fonts defined. By adding macro packages you can predefine a while set of operations at the functional level. For example, a paragraph. Once this is done, you only need to change how the macro responds rather than having to change all places where you inserted some troff commands (such as the .sp above) to change the document format.
It is not my intent to explain how all this works here, just to let you know the capabilities exist. The common macro packages are:
Today, you are most likely to see man used for formatting manual pages and mm for more general use. There is, however, nothing that says you cannot develop your own macro packages. SSC has used two locally-developed packages for close to twenty years.
The first of those packages was developed to produce SSC Pocket Reference Cards. These cards have 3.5 x 8 inch pages. Each page consists of titled boxes of command information and text using up to five colors. The macro package used here handles drawing the boxes, the colors and outputting two of these small pages on one one physical page. One side benefit is that by having two different sets of macros, proofing can be done on a color printer and then the color-separated output for the printer can be produced without the need for any additional programs or changes to the actual document.
The other set of macros was developed for classroom teaching. Again, the capability of producing two different outputs by changing the set of macros used is exploited. The complete document includes large-format text plus small-format discussions. This means the student notebooks can contain a lot of explanatory text without cluttering up the slides used in the classroom.
Earlier I said that troff works like an Etch-a-Sketch. That is, you have a workspace to write on rather than a line-by-line output device. While it is quite common to just work line-by-line, this means you can draw by moving back on the page. The troff preprocessors exploit this capability.
The most popular preprocessor is tbl which, as you might expect, is used to generate tables. It is very easy to use and allows tight control over table presentation including boxes, titles and flowed text in boxes. esides more control, every time I write a table in HTML, a remember how easy it used to be in tbl.
A less command but very powerful preprocessor is pic. pic allows you to draw pictures. A better explanation is boxes, circles, arrows and such. In other words, diagrams.
Hopefully, this article has given you an idea what troff is and what it can do. If all you need to do is convert current troff documents into HTML, you should have enough information to get on with the task. On the other hand, if you see a use beyond conversion, there is a lot more to learn. If this is the case, you are welcome to add a comment suggesting what else you would like to hear about.
Phil Hughes is Group Publisher of SSC's publications. He lives in Costa Rica where the telemarketers only speak Spanish.
Phil Hughes is the publisher of Linux Journal, and thereby Linux Gazette. He dreams of permanently tele-commuting from his home on the Pacific coast of the Olympic Peninsula. As an employer, he is "Vicious, Evil, Mean, & Nasty, but kind of mellow" as a boss should be.
|
...making Linux just a little more fun! |
By Sandro Mangovski |
So here is my work, step-by-step so you can follow it. I hope it will help you to build your own anti-spam system, or just give you the guidelines of how to make your own idea come to life.
When I started working on this problem I decided to build a solution from scratch and reinstall or replace most of software which I had been using before. So I picked the new tools: Exim MTA, SpamAssassin, Anomy mail sanitizer, and vm-pop3d. I downloaded all the software and started building it, which is your first step also.
Step 1.
Exim MTA: You download Exim .tar.gz package from www.exim.org
and unpack it to some directory. At the time of writing this document,
the latest Exim version is 4.24. Cd to the directory which has been
created (for example, exim-4.24). Next, you copy the file src/EDITME to
Local/Makefile, but before that you need to fill in some information to
src/EDITME. The following is the least you should set up:
BIN_DIRECTORY=/usr/exim/bin
CONFIGURE_FILE=/usr/exim/configure
EXIM_USER=eximusr
I created this user just for Exim and I suggest you do this also. Of course, the username doesn't have to be the same.
I also set up FIXED_NEVER_USERS=root for security precautions. This file is also very well commented, so if you need some other options, it is not hard to find out how to set it up; but this configuration should do just fine for your office network.
If you are going to build the Exim monitor, a similar configuration process is required. The file exim_monitor/EDITME must be edited appropriately for your installation and saved under the name Local/eximon.conf.
If you are happy with the default settings described in exim_monitor/EDITME, then Local/eximon.conf can be empty, but it must exist.
After the preinstall configuration you'll need to compile the software. Commands make and make install should do the trick. After this, you do some post install configuration and you'll be almost done. Open the file /usr/exim/configure with your favorite editor and change
domainlist local_domains = @
to
domainlist local_domains = @ : localhost : foo.bar
or some other domain you want exim to deliver to locally. Configuring Exim with virtual domains is beyond the scope of this document, but still we'll touch on it at the end of this document. What you need do next is to get Exim to run whenever the computer boots up. I prefer doing this from inetd. To do this, add the following line to /etc/inetd.conf:
smtp stream tcp nowait eximusr /usr/sbin/tcpd /usr/exim/bin/exim -bs
Here eximusr is the user which was set in the EXIM_USER variable in src/EDITME
Now restart inetd and telnet to your machine on port 25. You should get a line like this:
220 enterprise ESMTP Exim 4.24 Fri, 28 Nov 2003 20:03:32 +0100
which indicates that all went Ok :) This is all you have to do with exim for now.
Anomy mail sanitizer: Unpack the .tar.gz package from mailtools.anomy.net in some directory (e.g. /usr/local is mine) and cd to anomy/bin. Then run ./sanitizer.pl. You will probably get some error message but that is ok. Probably the error message will be something about missing a Perl module, and we will come back to it later. If you do get any errors, leave it like that for the moment and read on.
SpamAssassin: Unpack the .tar.gz package and cd to the newly created directory. There are two ways of installation. The first one is shorter and saves you some minor difficulties. Type following set of commands in the shell as root:
perl -MCPAN -e shell
o conf prerequisites_policy ask
install Mail::SpamAssasin
quit
This way installs SpamAssasin using module CPAN. If this is your first time using that module, after the first command you will be asked a series of questions for CPAN configuration.
This is the second way:
perl Makefile.PL
make
make install
When you run spamc or spamd you may get the same problem as with anomy. Don't worry, just read on. Now we will explain the missing module error. If your error message is something like missing module, for example HTML/Test.pm, then install it using MCPAN; or go to the www.cpan.org and search for the module HTML::Test and download it. If you need to install the Perl module, it is not very difficult. Unpack the .tar.gz package and cd to the newly created directory. Type the following set of commands as root:
perl Makefile.PL
make
make test
make install
Now since you know how to install Perl modules, you can also fix that anomy missing modules errors. When installing modules you may have same error as with SpamAssasin or anomy because Perl modules may need other modules to work. So once again go to www.cpan.org and start over until you resolve all requirements. For example, on my system I needed to install the following modules for both anomy and SpamAssasin: HTML::Parser, HTML::Tree, HTML::Tagset, HTML::Sanitizer, MIME::Base64, Test::Harness, Test::Simple, Digest::MD5 and Devel::CoreStack. Unfortunately, I don't remember which modules were prerequisites of the others, so you will have to read README files or get error messages until everything is installed.
There is one more thing to do with SpamAssasin. Since spamc is just client for spamd we need to make sure that spamd is running when mail is passed through spamc. Just add spamd --daemonize to your init script.
vm-pop3d: Unpack .tar.gz source from www.reedmedia.net and cd into the newly created directory (Do you see a pattern here?).Type following commands as root:
./configure
make
make install
Now we have to make vm-pop3d running when computer starts.Add this line to your /etc/inetd.conf file:
pop3 stream tcp nowait root /usr/sbin/tcpd /usr/local/sbin/vm-pop3d
Restart inetd and telnet to localhost on port 110. A line similar to this:
+OK POP3 Welcome to vm-pop3d 1.1.6 <14665.1070049711@enterprise> means you are at the end of Step 1.
If you had any problems with building which I didn't describe browse through the documentation or ask on Usenet or try to figure a way yourself like I had to do in the following step, which is configuring of all the sotfware we built.
Step 2.
A little introduction and a small request from me. Read the Exim documentation parts about mail delivery, routers, transports just to have some background before we start working. I'm still going to write something about it here. So, when Exim receives mail it goes from router to router until it is accepted. When a message is accepted, the router calls its transport to handle the message. If the message isn't delivered after it went through transport, it goes once again through more routers until it is accepted and delivered, or until an “undeliverable” error message is generated. That is the shortened version of the story. So, if you read carefully you might have concluded that the order of the transports which are listed in the configuration file of exim is irrelevant, but the order of routers is important.
Now you have to get your hands dirty. Open /usr/exim/configure with your favorite editor and add this in routers section before routers who handle local delivery (after the dnslookup router).
# MAIL SCAN ROUTER
mail_scan_router:
no_verify
check_local_user
condition = "${if !eq{$header_X-I-came-to:}{scary devil's monastery}{1}}"
driver = accept
transport = mail_scan_transport
This router will be run only if message doesn't contain X-I-came-to:scary devil's monastery header, or by other words only when it first arrives. With that condition we disabled the router loop that would have been created without it. Now we have to add the transport which this router calls when the condition is met. So add this anywhere in the transports section (remember, the order of transports is irrelevant).
#MAIL SCAN TRANSPORT
mail_scan_transport:
driver = pipe
command = /usr/exim/bin/exim -bS
use_bsmtp = true
transport_filter = /usr/exim/mail.sh
home_directory = "/tmp"
current_directory = "/tmp"
user = mail
group = mail
log_output = true
return_fail_output = true
return_path_add = false
message_prefix =
message_suffix =
headers_add = X-I-came-to: scary devil's monastery
This transport handles the message through transport filter and adds an X header, which in combination with a condition in the router disables any infinite filtering/spamchecking loops.
Now let's write mail.sh. This is script which enables us to run both anomy sanitizer and SpamAssasin within single transport. It goes like this:
#!/bin/bash
cd /usr/local/anomy/bin
./sanitizer.pl | /usr/local/bin/spamc
cd /tmp
#end of script.
Maybe all this cd-ing seems strange, but I had some errors when running anomy from outside of its directory. Anyway, copy this code into a file. Save it in /usr/exim and make sure it has permissions which enable user mail to run it. For example my permissions look like this:
-rwxr-xr-x root root.
Now a little bit more on the Exim configuration. When SpamAssassin scans a message it adds X-Spam-Status header to it. We will use that to check whether the message is spam and to decide where it should be delivered to. Add this just before local_delivery router (remember that routers order is relevant)in your Exim configuration file.
#SPAM DELIVERY ROUTER
spam_delivery_router:
condition="${if eq {${length_3:$header_X-Spam-Status:}}{Yes}{1}}"
check_local_user
driver=accept
transport = spam_delivery
So, if first 3 characters of X-Spam-Status: header are Yes that means that the message is spam and we will use spam_delivery transport. Otherwise message goes to normal local delivery. Now, add this to transports section of configuration file:
spam_delivery:
driver = appendfile
create_directory
file=/var/spool/virtual/spam.foo/$local_part
delivery_date_add
envelope_to_add
return_path_add
group = mail
mode = 0660
This means that, for example, messages for local user sandro ( sandro@localhost) are delivered to /var/spool/virtual/spam.foo/sandro. Make sure that directories virtual and spam.foo look like this when you do ls -l in their parent directories:
drwxrwsrwx 3 mail mail 4096 Stu 27 19:05 virtual
drwxrwxrwx 2 mail mail 4096 Stu 28 21:08 spam.foo
Of course I don't need to remind you to restart inetd after these changes.
Now you can see what these two dirs are for. They are for delivering spam to local users. Yes, we will create virtual domain spam.foo for vm-pop3d (pop3 daemon if you haven't got it by now) so our users will be able to read their spam. Why, you ask? Because in my case many users complain about missing newsletters, commercials etc. Mail in /var/spool/virtual/spam.foo in my case gets deleted weekly (a simple script in cron.weekly) because system's resources are limited and we wouldn't want to waste them on spam more than we have to, do we?
Ok, now to configure vm-pop3d. We don't need to do anything for local users' “real” mails, but we need to do for spam. Each local user will get an account for spam.foo virtual domain. MUA configuration will then be slightly different than for the “real” mailbox. For example if a user has the local username vms then his username for spam mailbox is vms@spam.foo or vms:spam.foo. Of course passwords don't have to be the same for these two mailboxes. Note that here we have a similar “as it can be” concept like Yahoo(tm) Bulk mail folder
Now, let's create that spam accounts. Create directory /etc/virtual which needs to look like this:
drwxr-xr-x 3 root root 4096 Stu 25 21:22 virtual.
It is not critical that the permissions are exactly the same as here, but vm-pop3d must be able to read the directory. So, if you don't like these, play with them and come up with some other combination. I just say this because I don't want you to get the impression that my way is the only right way.
Now under that directory create directory spam.foo with same permissions. That directory will contain passwd file for our virtual domain. We will create that file with a Perl script which i got from vm-pop3d authors' website. Here is that script:
#!/usr/bin/perl
$name = $ARGV[0];
@salt_chars = ('a'..'z','A'..'Z','0'..'9');
$salt = $salt_chars[rand(62)] . $salt_chars[rand(62)];
$passwd = crypt ($ARGV[1], $salt);
print "$name:$passwd\n";
Now save this script in a file and make sure it is executable by root, or whoever is mail admin.
Script is used in a way ./script_file_name username password >> /path_to_passwd/passwd. For example:
enterprise:/etc/virtual# pop3passwd mosor uncrackable >> spam.foo/passwd
Now you can add a username for spam.foo domain for all your local users, and the vm-pop3d configuration is finished.
What comes next is some SpamAssasin fine tuning. Open /etc/mail/spamassassin/local.cf and change report_safe 1 to report_safe 0.
If this option is set to 1, if an incoming message is tagged as spam, instead of modifying the original message, SpamAssassin will create a new report message and attach the original message as a message/rfc822 MIME part (ensuring the original message is completely preserved, not easily opened, and easier to recover. If this option is set to 2, then original messages will be attached with a content type of text/plain instead of message/rfc822. This setting may be required for safety reasons on certain broken mail clients that automatically load attachments without any action by the user. This setting may also make it somewhat more difficult to extract or view the original message.If this option is set to 0, incoming spam is only modified by adding some "X-Spam-" headers.
Another thing which is important when working with spam is efficient learning technique. Man page is the best resource for SpamAssasin learning strategy (I urge you to read it, and all the references inside), but it all comes down to this: the more the filter learns, the better it gets. The technical side of learning is this:
sa-learn --spam path_to/message_file
or
sa-learn --ham path_to/message_file.
Of course --spam is for spam mails and --ham for mails which are not spam. It is equally important to let filter learn both spam and ham mails.
And that is it. You have a working anti-spam system, congratulations.
There are a few more things. If you don't have a permanent Internet connection, fetchmail is the way you'll retrieve your mails. So let's configure fetchmail. Unpack .tar.gz package and cd to the newly created directory (Now I am even boring myself). Type as root:
./configure
make
make install
Now you need to configure fetching mail for the users. Each user needs to have .fetchmailrc file in his home directory. A simple .fetchmailrc file looks like this:
poll pop.iskon.hr proto pop3 username "amangovs" password "Unkrakkable" is "sandro" here nokeep expunge 3
Fetchmail's configure file format is excellently explained in man pages, so I strongly advise you to read them.
Now for little more fine tuning. We need to go to the /etc/aliases file and set some aliases. The most important alias is postmaster which you must set, but I advise you to spend a minute more and set them all.
Since receiving mail has by now been fully covered, now here is something about sending it. You might know it already but I'll still mention it. If your network has a permanent connection to internet and you have a fully qualified domain name (this could be dynamic DNS, too), with an MX DNS entry your users can use your mail server as their smtp server. Otherwise (if your mail is retrieved via fetchmail), users should put their provider's smtp server in their MUA (mail user agent).
Now as I promised here is a little something about virtual domains in Exim.
local_delivery:
driver = appendfile
file = /var/spool/virtual/$domain/$local_part
delivery_date_add
envelope_to_add
return_path_add
group = mail
mode = 0660
If you change your local_delivery transport in Exim configuration file to this Exim would deliver message for some_username@some_domain.com to /var/spool/virtual/some_domain.com/some_username. Now what you have to do more is add some_domain.com in domainlist local_domains = @ : localhost : foo.bar: domain1.com : domain2.com : some_domain.com (remember this?) and configure vm-pop3d just as you configured it for spam.foo domain. Please, remember to check permissions, it will save you some time.
That's all folks! It is a pleasure writing for you :)
Sandro Mangovski.
None provided.
|
...making Linux just a little more fun! |
By Rick Mann |
The geek word for starting up a computer is bootstrapping. The short version is booting or boot. The initial part of this process is performed by code stored in ROM. This is code that is general in nature rather than being specific to Linux. Its task is to load the Linux-specific loader and turn control over to it.
The boot loader is the program loaded by the ROM (either the BIOS on the motherboard or device-specific code like on a SCSI disk controller board). There are two popular boot loaders for PCs. LILO is the traditional loader and GRUB is the newer one. Each program has the task of grabbing some configuration information, loading the Linux (or other) kernel and turning over control.
The most significant difference between LILO and GRUB is how it gets the configuration information. The configuration for LILO is saved in a static form by running the lilo command. This information is written to either the master boot record (MBR) of the disk or to the boot record of the Linux root partition. The configuration information used by the lilo command is normally stored in /etc/lilo.conf. Here is a sample configuration file.
boot=/dev/hda   # boot loader to MBR
root=/dev/hda1  # root partition
install=/boot/boot.b
map=/boot/map
delay=50        # 5 second delay before auto-boot
image=/vmlinuz  # kernel
  label=linux   # name to refer to entry
  read-only
image=/vmlinuz.old      # backup entry
  label=old
  read-only
In this example, there are two possible kernels to boot: /vmlinuz and /vmlinuz.old. At the LILO prompt you can select between them by entering linux to select the current one or old to select the backup one. Pressing the TAB key at the LILO prompt will list these options. If you rebuild your kernel or want to make any other change you will need to rerun the lilo command to re-read the configuration file and re-install LILO with this new configuration information.
GRUB reads the configuration file at boot time. The MBR is only 512 bytes. The portion of GRUB that is installed in the MBR does some basic initialization of the system, figures out how to access the boot drive and then loads the rest of GRUB from the drive.
GRUB is installed by the grub-install program. There should be a man or info page available with the details. The grub info page is also very helpful. The configuration file is generally located in the /boot/grub directory. SuSE puts it in menu.lst and Red Hat in grub.conf. Here is a sample configuration file:
default 0
timeout 8
gfxmenu (hd0,1)/boot/message

title Linux
    kernel (hd0,1)/boot/vmlinuz root=/dev/hda2 desktop showopts
    initrd (hd0,1)/boot/initrd

title Failsafe
    kernel (hd0,1)/boot/vmlinuz root=/dev/hda2 showopts ide=nodma apm=off acpi=o
ff vga=normal nosmp noapic maxcpus=0 3
    initrd (hd0,1)/boot/initrd

title Memory Test
    kernel (hd0,1)/boot/memtest.bin
If you are sharing the computer with a proprietary OS from Redmond, take note that those people don't realize there are other operating systems available. That means that when you install their system the just overwrite the MBR. If you install their software first followed by Linux, all should be okay and you will be able to boot either OS.
Run levels offer you an array of system configurations. Unless told otherwise, the system will come up at the default run level which is typically level 3 or level 5. You can alter this behavior by entering the label name in LILO or the word boot in GRUB followed by the word single at the boot loader prompt.
There are seven standard run levels: 0 through 6. Level 0 means shutdown, level 1 is single-user mode and level 6 means reboot. The other levels are available at your discretion to set up various system configurations. The most typical is to use run level 3 as a fully-operational system without the GUI (X) running and level 5 like level 3 with the GUI. On many systems, there is a run level called S which is like run level 1 but requires the root password to be entered. This is there for security reasons.
The contents of the file /etc/inittab determine what action is to be taken at each run level and also specifies the default run level. Here is a sample of what might appear in /etc/inittab:
# # /etc/inittab # # This is the main configuration file of /sbin/init, which # is executed by the kernel on startup. # # The default runlevel id:5:initdefault: # /etc/init.d/rc takes care of runlevel handling # # runlevel 0 is System halt (Do not use this for initdefault!) # runlevel 1 is Single user mode # runlevel 2 is Local multiuser without remote network (e.g. NFS) # runlevel 3 is Full multiuser with network # runlevel 4 is Not used # runlevel 5 is Full multiuser with network and xdm # runlevel 6 is System reboot # l0:0:wait:/etc/init.d/rc 0 l1:1:wait:/etc/init.d/rc 1 l2:2:wait:/etc/init.d/rc 2 l3:3:wait:/etc/init.d/rc 3 l5:5:wait:/etc/init.d/rc 5 l6:6:wait:/etc/init.d/rc 6 # what to do in single-user mode ls:S:wait:/etc/init.d/rc S ~~:S:respawn:/sbin/sulogin # what to do when CTRL-ALT-DEL is pressed ca::ctrlaltdel:/sbin/shutdown -r -t 4 now # getty-programs for the normal runlevels #: : : # The "id" field MUST be the same as the last # characters of the device (after "tty"). 1:2345:respawn:/sbin/mingetty --noclear tty1 2:2345:respawn:/sbin/mingetty tty2 3:2345:respawn:/sbin/mingetty tty3 4:2345:respawn:/sbin/mingetty tty4 5:2345:respawn:/sbin/mingetty tty5 6:2345:respawn:/sbin/mingetty tty6
The line id:5:initdefault: sets the default run level to 5.
The lines of this form l1:1:wait:/etc/init.d/rc 1 invoke
the script /etc/init.d/rc passing it the run level as an
argument. This script then starts the processes associated
with the specific run level (and stops other processes). All of the
scripts to control each process are also located in the
/etc/init.d directory.
Typically, which processes are to be started and stopped at each run
level are located in sub-directories (for example, rc5.d
for run level 5) of /etc/init.d. In each of these
runlevel-specific directories, symbolic links are used to identify the
processes. Link names starting with K refer to processes that are
to be stopped (killed) and link names starting with S refer to
those which are to be started. The links are accessed alphabetically
which means the kill scripts are run first and the order of the scripts
within the kill and start lists are controlled by using a 2-digit number
immediately following the K or S.
I said typically as this is the standard way to handle this information. Some vendors use slightly different schemes but, in all cases, the generainit program are what controls the whole process. If you are familiar with how UNIX handles startup, this is very similar to System V Init.
If there were no problems encountered along the way your system should
now be at the chosen run level. Once the system is up and running you
can change run levels by logging on as root and using the init command.
For example, to change to run level 3, you would enter init
3.
Rick Mann has been programming in C and working with POSIX-compliant operating systems for 12 years.
None provided.
|
...making Linux just a little more fun! |
By Willy Smith |
Bring up the Control Center program and click on YaST2. Alternately,
you can to directly to YaST2, as this is the program you really need.
From the YaST2 menu, click on System. Then click on Editor for
/etc/sysconfig Files. If you are not logged in as root, you will have
to enter your root password to get to the corect menu. Once you get to
the Configuration Options, click on Desktop to expand that tree, then
click on Display Manager for the next level. Inside this tree you
should see and entry called DISPLAYMANAGER_AUTOLOGIN. Click on this
entry, and you should see a text window appear with the current value
of this setting. I changed mine from Willy to no entry (blank) with the
pulldown arrow, and now my system boots to the graphic login prompt,
the way I wanted it in the first place.
None provided.
|
...making Linux just a little more fun! |
By Willy Smith |
I need to be able to type in more than one language. My primary language is English, so I want to use the standard US English keyboard layout; but I also need to be able to type in Spanish, French, and German. The same requirements would also apply to users of other languages such as Italian and Portuguese, as well as several other Western European languages. In these languages, there are special accents and symbols which are not available on the US keyboard. It's very simple to give your keyboard this ability without changing the entire layout.
Since I'm comfortable with the standard English keyboard
layout, and most of my work is in English, I don't want to have to
switch layouts when I switch languages. While I may occasionally have
to use a Spanish or French layout keyboard (for example, in an
Internet café), I find it awkward to have to switch the entire
layout on my office computer to accomodate my different language
needs. Also, I personally find it irritating to have a layout
different from the legend printed on the keytops. The Linux KDE
environment provides total flexibility in this regard. In fact, when
I was researching this article, I found the fexibility to be almost
overwhelming. So this article focuses on how to achieve my own
general requirement as outlined above.
I'm running SuSE 9.0 Linux with the KDE windowing environment. It's very simple to enable the use of accents by accessing the Control Center on the main menu. If you're running a different version of Linux, you'll have to find the equivalent setup menu; perhaps some who are running different versions can add comments to this article about the necessary steps. First, you click on the Regional and Accessibility menu, which has two flags as its icon. Then you click on "Keyboard Layout". There are two tabs for this section. The first tab, labeled "Layout", lets you select from a list of keyboard models. My selection here is the "Generic 104-key PC". The primary layout is "U. S. English w/ deadkeys". This layout changes several of the standard punctuation marks so that they can be used to generate characters with accents. For Spanish and French, I need to be able to put acute, grave, and circumflex accents; occasionally I need other special characters, for example the Umlaut in German. The dead key layout takes care of this need very easily. With this layout, you simply type a single quote ', left single quote `, double quote ", tilde ~, or circumflex ^ to obtain the character you want. The following is a list of the possibilities:
Symbol   Next Letter    Result

'          aeiou c      áéíóú ç
`          aeiou        àèìòù
"          aeiou        äëïöü
~          ao n         ãõ ñ
^          aeiou        âêîôû
These same sequences work for the capital letters, too. Note that this does take a little getting used to, as if you want only the quote character, you have to press the space bar to make it show up. I found that I quickly got used to this and it became automatic. In fact, it's even easy to change back and forth among computers which are not set up with dead keys, much easier than switching the entire keyboard layout.
For Spanish punctuation, and other special symbols not available on the US keyboard, I needed to set one other option. Go back to the Control Center, click on the Options tab which is next to the Layout tab. Click on the pulldown under the "Compose Key" entry. There you will find several choices for this function. I chose "Right Alt is Compose", although you may want to select the "Windows" or "Menu" key if this is convenient for you. Now I can get the ¿ and ¡ symbols I need for this language. Press the Compose key you have chosen and the correct sequence to get these symbols. For example, to get the upside-down question mark, press the Right Alt key, then the shift key, then the "?" key twice. Again, this may seem complex, but it is quickly learned and becomes automatic.
To get a list of all the symbols which are available to you with the compose key sequences, bring up a console window and type "dumpkeys | grep compose". That's a vertical bar in between dumpkeys and grep; if you can't find the vertical bar character, you can just type "dumpkeys", but you will have to look through the list of all possible keys and find the ones which say "compose". In either case, you will find a list of all possible keypress sequences and the resulting symbols. For example, on my computer I can get the German ß by pressing Right Alt while typing "s" twice, the £ by pressing Right Alt while typing "-L", and the © by pressing Right Alt while typing "oc". The only one I'm missing is the symbol for the euro. Perhaps someone else can figure this out and post it in the comments. Here is a dump of my symbol table:
|
Sequence |
Result |
|---|---|
|
`A |
À |
|
`a |
à |
|
'A |
Á |
|
'a |
á |
|
^A |
 |
|
^a |
â |
|
~A |
à |
|
~a |
ã |
|
"A |
Ä |
|
"a |
ä |
|
-a |
ª |
|
-A |
ª |
|
OA |
Å |
|
oa |
å |
|
0A |
Å |
|
0a |
å |
|
AA |
Å |
|
aa |
å |
|
°A |
Å |
|
°a |
å |
|
AE |
Æ |
|
ae |
æ |
|
,C |
Ç |
|
,c |
ç |
|
^C |
Ç |
|
^c |
ç |
|
`E |
È |
|
`e |
è |
|
'E |
É |
|
'e |
é |
|
^E |
Ê |
|
^e |
ê |
|
"E |
Ë |
|
"e |
ë |
|
`I |
Ì |
|
`i |
ì |
|
'I |
Í |
|
'i |
í |
|
^I |
Î |
|
^i |
î |
|
"I |
Ï |
|
"i |
ï |
|
-D |
Ð |
|
-d |
ð |
|
^D |
Ð |
|
^d |
ð |
|
~N |
Ñ |
|
~n |
ñ |
|
^N |
Ñ |
|
^n |
ñ |
|
`O |
Ò |
|
`o |
ò |
|
'O |
Ó |
|
'o |
ó |
|
^O |
Ô |
|
^o |
ô |
|
~O |
Õ |
|
~o |
õ |
|
"O |
Ö |
|
"o |
ö |
|
/O |
Ø |
|
/o |
ø |
|
-o |
º |
|
-O |
º |
|
`U |
Ù |
|
`u |
ù |
|
'U |
Ú |
|
'u |
ú |
|
^U |
Û |
|
^u |
û |
|
"U |
Ü |
|
"u |
ü |
|
'Y |
Ý |
|
'y |
ý |
|
TH |
Þ |
|
th |
þ |
|
ss |
ß |
|
"y |
ÿ |
|
sz |
ß |
|
nn |
ñ |
|
nh |
ñ |
|
NY |
Ñ |
|
NN |
Ñ |
|
NH |
Ñ |
|
Ny |
Ñ |
|
Nn |
Ñ |
|
Nh |
Ñ |
|
-L |
£ |
|
<< |
« |
|
>> |
» |
|
?? |
¿ |
|
^? |
¿ |
|
!! |
¡ |
|
^! |
¡ |
|
^1 |
¹ |
|
^2 |
² |
|
^3 |
³ |
|
+- |
± |
|
c= |
¢ |
|
c/ |
¢ |
|
/c |
¢ |
|
-c |
¢ |
|
-C |
¢ |
|
|c |
¢ |
|
|C |
¢ |
|
L= |
£ |
|
-L |
£ |
|
-l |
£ |
|
^* |
× |
|
^x |
× |
|
xx |
× |
|
^. |
· |
|
.. |
· |
|
^/ |
÷ |
|
^: |
÷ |
|
-: |
÷ |
|
:- |
÷ |
|
Y= |
¥ |
|
=Y |
¥ |
|
-Y |
¥ |
|
-l |
¥ |
|
(c |
© |
|
"c |
© |
|
OC |
© |
|
(C |
© |
|
C) |
© |
|
-a |
ª |
|
-A |
ª |
|
-o |
º |
|
-O |
º |
|
(r |
® |
|
"r |
® |
|
OR |
® |
|
(R |
® |
|
R) |
® |
|
mu |
µ |
|
PP |
¶ |
|
14 |
¼ |
|
12 |
½ |
|
34 |
¾ |
|
e= |
¤ |
|
-e |
¤ |
|
-E |
¤ |
|
=E |
¤ |
|
vS |
¦ |
|
^S |
¦ |
|
vs |
¨ |
|
^s |
¨ |
|
vZ |
´ |
|
^Z |
´ |
|
vz |
¸ |
|
^z |
¸ |
|
OE |
¼ |
|
Oe |
¼ |
|
oe |
½ |
|
"Y |
¾ |
|
ij |
ÿ |
|
IJ |
¾ |
|
|s |
$ |
|
|S |
$ |
|
SS |
§ |
|
=C |
¤ |
|
C= |
¤ |
|
ox |
¤ |
|
xo |
¤ |
Make sure you press "Apply" on the Control Center menu before you try the new layout, as the changes don't become effective until you've either done this or exited from this program.
None provided.
|
...making Linux just a little more fun! |
By Willy Smith |
The following are excerpts of the document, to give you an idea of the scope and conclusions of the study:
---
The test system was based on SuSE 8.2 and KDE 3.1.2
For each test subject, the test consisted of three parts:
- the pretest questionnaire regarding background experience and demographical data.
- the usage test: the performance of typical office tasks.
- the posttest questionnaire regarding preference, problems, changes of opinion, and also considering the ease of learning and estimation of competence.
In total, we tested 80 participants, 60 of those on Linux and 20 on Windows XP. The usual and sufficient number for a usability test is 10 to 20 people. We chose this unusually high number of test participants so as to differentiate between user types.
- Users have a general competence in the daily use of Windows at work
- Users have no administrative rights or root privileges, they are, therefore, unable to install applications or change central settings.
- The computer is largely preconfigured.
- Use of the computer is mostly restricted to specific applications in a practically homogenous surrounding
- Users have an administrator or members of support staff at hand in case they face any technical problems
- If any system changes are implemented, users will be trained accordingly
The tasks were:
1. Configure the screensaver so that it comes on after 20 minutes.
2. Please use a word processing program of your own choice to write the following lines: Harry Potter In the latest Harry Potter novel, an important person will lose his or her life. Format the first line as a centered heading. Add page numbers on right hand upper margin of the page. Print the document. Save the document as "Potter.doc" in WORD format in your personal folder. Close the program.
3. Play the third title of the music CD placed next to you and listen to it briefly. Change the program's volume control to a comfortable level. Close the application and remove the CD from the drive.
4. In your personal folder, create a new folder of any name. On a computer (called “henriette") connected via network, look for the document "Besprechung.doc" in the folder "Unterlagen". Please copy this document to the previously created local folder.
5. List all files from your personal folder which have been created on 06/25/2003 and start with the letters “Vorschlag".
6. Save (burn) the previously copied document "Besprechung.doc" (in your created folder) onto a CD (which you will find beside you). Afterwards, remove the CD from the drive.
7. Open the email application. You have received a new mail which mentions the date of an appointment. Have a look at the organizer and see whether you are still free on that date. If that date is still available, please enter the appointment.
8. Write an email to Michael Meier, the contact details of whom you will find in the address book. As a “subject" please enter “Anfahrt" and in the main text area "Anbei die Anfahrtsskizze". Please enclose a document called "Anfahrtsskizze.gif" as an attachment. This can be found amongst your personal documents in the picture folder. Send the mail.
9. Look for a program which can display .pdf files. Place an icon/symbol of that program in the bottom bar so that you can start the program with a single click.
10. Please open a Web Browser and load the web page that is listed in the bookmark folder "Pictures“ ("Bilder“). Set the picture shown on this web page as the desktop background of your computer.
At first glance, this choice of tasks seems to contain ones which are not conventional work related office applications, like playing a music CD or changing the background image. Nevertheless, those tasks were useful in categorizing the test subjects into different user types and in discovering usage patterns on the basis of certain behavior patterns. The choice of tasks was “neutral" on purpose. This means that the problems were decided upon during the test design phase, before their complexity had been assessed on either system.
The results showed that the Linux Desktop is not a user's nightmare. On the contrary, the test participants liked it and enjoyed using it. Not only was the general look and feel accepted by the users but some Linux applications even turned out to be more usable than their Windows XP equivalents. Also, the general productivity did not decrease.
Additionally, there is the advantage of a flexible and highly configurable system, highly adaptable to the needs of an individual company and its employees. Linux offers advantages in many ways, not least on the desktop. This adaptation has to take into account the employees' experiences, skills, expectations and potentials. The return on this comparably low investment will be high because of higher acceptance of the new desktop system, a shorter settling-in period and lower training needs. In even just taking into account the employees' experience the course of the migration will provide positive feedback.
However, apart from these generally positive results, we have to be aware of the following facts: The tested system was not "out of the box“ but pre-configured with usability guidelines in mind. This dealt with many of the problems that the users would have encountered using some default system. Based on the detailed results of our (and coming) usability tests, this configuration may be further optimized.
To summarize: It should be noted that a migration towards Linux, above all if it concerns the employees' desktops, is not only a technical or economic process, but essentially a matter of Human Resources. If this is taken into account, the effort of migrating to Linux will be comparable to migrating to any other operating system.
---
In short, this is a brief examination of where we are today with Linux on the desktop. Since Linux supports most languages, the study should be useful in most cases for companies or other organizations who already have computer literate people and who are considering licensing new software; it will also be useful to those who are not yet ready to migrate, but who still want to keep their finger on the pulse of how Linux is advancing in the workplace.
None provided.
|
...making Linux just a little more fun! |
By LG Staff |
That's fine for building a CD from ordinary files stored on your hard disk (that is, text, data, music and such) but sometimes you need to do the equivalent of copying a CD image onto a new CD. A common place where this happens is with a Linux distribution. For example, Knoppix is distributed like this as is the SuSE Live Evaluation.
You might think that using cp or dd would do the task. After all, to us UNIX people, a file is a file. Unfortunately that doesn't work with creating CDs because you can't just write bits to the CD and be home free.
Fortunately, there is a program that understands how to deal with writing CDs and isolates you from most of the pain. The program is cdrecord and most GUI-based CD creation programs actually use cdrecord to do the actual writing.
Unless you what address your CD writer lives at on the bus, you will
want to enter
cdrecord -scanbus
This command will scan for devices and print out their addresses in the
format that cdrecord wants.
Note that I am doing this with a SCSI CD writer. I am not sure what you
will see with an IDE device.
In my case, the line that matters in the output is
0,4,0 4) 'HP ' 'CD-Writer+ 9600 ' '1.0a' Removable CD-ROMand the 0,4,0 in the line is the information I need to feed to the program.
It is likely that this is all the information you will need as cdrecord polls the device and seems to default well. If this is not the case, grab the manual for your CD writer, type man cdrecord and start reading.
Assuming you don't want to get fancy, a command line with dev= followed by the device and then the name of the ISO image to write out should do it. Optionally, the -v option will give you a little more information when the program is running.
For example, on my system, to write the SuSE 9.0 ISO image, I entered
cdrecord -v dev=0,4,0 Suse-9.0*iso
The *, of course, is just a shell wildcard to save me typing a very
long file name.
Just for comparison, this is what my output looks like from the command.
Cdrecord 2.0 (i686-suse-linux) Copyright (C) 1995-2002 Jörg Schilling
TOC Type: 1 = CD-ROM
cdrecord: Warning: not running as root user, fs= option ignored.
scsidev: '0,4,0'
scsibus: 0 target: 4 lun: 0
Linux sg driver version: 3.1.24
Using libscg version 'schily-0.7'
cdrecord: Warning: using inofficial libscg transport code version
(okir@suse.de-scsi-linux-sg.c-1.75-resmgr-patch '@(#)scsi-linux-sg.c
1.75 02/10/21 Copyright 1997 J. Schilling').
atapi: 0
Device type    : Removable CD-ROM
Version        : 4
Response Format: 2
Capabilities   : SYNC
Vendor_info    : 'HP      '
Identifikation : 'CD-Writer+ 9600 '
Revision       : '1.0a'
Device seems to be: Generic mmc CD-RW.
Using generic SCSI-3/mmc CD-R driver (mmc_cdr).
Driver flags   : MMC-2 SWABAUDIO
Supported modes: TAO PACKET SAO SAO/R96R RAW/R96R
Drive buf size : 4183552 = 4085 KB
FIFO size      : 4194304 = 4096 KB
Track 01: data   648 MB
Total size:      745 MB (73:50.37) = 332278 sectors
Lout start:      745 MB (73:52/28) = 332278 sectors
Current Secsize: 2048
ATIP info from disk:
  Indicated writing power: 7
  Is not unrestricted
  Is not erasable
  ATIP start of lead in:  -11597 (97:27/28)
  ATIP start of lead out: 336601 (74:50/01)
Disk type:    Short strategy type (Phthalocyanine or similar)
Manuf. index: 20
Manufacturer: Princo Corporation
Blocks total: 336601 Blocks current: 336601 Blocks remaining: 4323
RBlocks total: 346489 RBlocks current: 346489 RBlocks remaining: 14211
Starting to write CD/DVD at speed 12 in real TAO mode for single
session.
Last chance to quit, starting real write    0 seconds. Operation
starts.
Waiting for reader process to fill input buffer ... input buffer ready.
Performing OPC...
Starting new track at sector: 0
Track 01:  648 of  648 MB written (fifo 100%) [buf  99%]  12.1x.
Track 01: Total bytes read/written: 680501248/680501248 (332276
sectors).
Writing  time:  400.168s
Average write speed  11.9x.
Min drive buffer fill was 99%
Fixating...
Fixating time:   22.958s
cdrecord: fifo had 10719 puts and 10719 gets.
cdrecord: fifo was 0 times empty and 10592 times full, min fill was 93%.
There is some useful information in there and one very important piece of information. In the last line, cdrecord tells you if the FIFO was ever empty and, also, how low it ever got. This is the buffer to the device. You are transfering the data to the CD in real time. If the FIFO is ever empty, the CD will be corrupted. The minimum fill percentage is a good way to check how close you are to not keeping up. If this number gets fairly low, you should stop all unnecessary processes when you are writing a CD.
Linux Gazette staff and authors.
|
...making Linux just a little more fun! |
By Hal Stanton |
There are many photo gallery programs but they always seem inconvenient. They aren't included with most Linux distributions, they require complicated setup or they require a lot of command-line work to get the gallery done. Today, I was looking in the menus of Konqueror, KDE's File and Web browser, and saw an entry in the Tools menu called Create Image Gallery. One of the reasons I probably missed it earlier is that it only appears in the Tools menu if you start Konqueror from the "House" icon.
In order to see what this magic tool might do, I created a new directory
and copied some pictures to it. You can do this however you want.
Working totally within Konqueror you can use New Directory item
in the Edit menu and then drag the desired files to the
directory. This is usually easiest if you open two Konqueror windows.
If you are a command-line user, mkdir and cp
can be used to do the same thing.
Once you have all the pictures you want in the directory, click on Create Image Gallery in the Tools menu. You will see a box of options to set the style of your gallery. There are options for images per line, fint, colors and what information is to be included. You can specify a page title and, by clicking the Directories you can specify the output file name (defaults to images.html), whether to recurse any subdirectories, if the files are to be copied and if a comment file is to be used.
I liked the idea of the comment file but found no documentation on it. Nothing on my system and a web search found nothing too. I could use some help here. Does anyone know how to use this feature?
[Note: I went to the KDE.org site and found out how to do this. You create a text file with the name you're going to use in the "Comments File" field. Each thumbnail will have the comment underneath the file name:
FILE1:
comment1
FILE2:
comment2
FILE3:
comment3
The order of the filenames is not important, but make sure you spell them correctly. The comment can be any length, the page will just have that line stretched down to fit it. Each time you change the file you will have to re-run the "Create Image Gallery" command, remembering to check the "Use Comment File" box which appears when you click on the "Directories" icon. -Willy Smith, editor]
Once you have selected the options you want, just click on Ok and your gallery will be created and displayed. It is as easy as that. If you aren't happy with the results, just modify the options and click OK again.
Hal Stanton was a Windows user for too many years. Now he can honestly say that Linux is a lot more fun.
None provided.
|
...making Linux just a little more fun! |
By Hal Stanton |
I needed an easy way to capture screens. I looked at various programs and decided to use Ksnapshot. Ksnapshot is amazingly easy to use and offers all the options I need. I am going to describe how to use it but, knowing it is there to be used is probably the most important part of this article.
I found Ksnapshot in the Utilities->Desktop menu of KDE. It can also be started by pressing Alt-F2 to display a Run Box and entering ksnapshot in the box. I suppose if you use it a lot you could add it as a desktop icon.
When you start Ksnapshot it grabs an image of your whole desktop before it displays itself. If this is what you wanted then all you have to do is select Print or Save. Many times you will want to grab a snapshot of a particular window on the desktop. This is easily accomplished by setting the Snapshot delay option to a few seconds and selecting the "Only grab the window containing the pointer" option. Then, click the New Snapshot button, move the mouse pointer to the window you want to capture and wait until the mouse pointer blinks.
If you elect to save the snapshot, you are offered format choices. Encapsulated PostScript (EPS), JPEG and PNG are the most portable between systems but you are also offered two Windows formats (icon and BMP), two X formats (X BitMap Image and X PixMap Image) and a few others.
When you print or save the snapshot, the dialog boxes are the standard you will expect to see with a KDE application. Once you are familiar with these and other standard dialogs (opening a file is another example) KDE applications become very easy to learn.
In my last article about making photo galleries I asked a question and received an answer. (Thanks Willy.) This time I have a more general question. Is there a place to find a summary of how to do these types of common tasks using KDE? I feel having this information would make it a lot easier for people to move to Linux.
Hal Stanton was a Windows user for too many years. Now he can honestly say that Linux is a lot more fun.
None provided.
|
...making Linux just a little more fun! |
By Hal Stanton |
Creating these cards is self-explanatory. In data entry mode, you see the list of the current cards, Front and Back boxes to enter the contents of a new card and buttons to add, delete and update a card. Using the file menu you can select an existing file to update, create a new file and save your changes. You don't have to be concerned about what is the front and what is the back of the card as there is a reverse button for use when you are displaying them.
There are three ways to display a set of cards: flash cards, random order quiz and ordered quiz. In the flashcard mode, one side of the card is displayed and you view the other side by clicking on a tab. A Next Card button allows you to move on and a bar at the bottom of the window shows you the percentage of the cards you have viewed.
In the quiz modes, one side of the card is shown and you type in the answer (other side of the card) in a box. Pressing the Check button will tell you if you guessed correctly and update your score. If you give up, you can press the Show Answer button. When all the cards have been displayed, your score is shown and you can start over.
This program isn't very sophisticated but this could be an asset. My kids could easily use this to create tests. It is fun and easy to use so I feel it has a lot of potential for unsupervised learning.
One thing that would have been nice would be the ability to print out cards. I was somewhat curious and looked at the data files that flashkard creates. The file extension is kvtml. I don't know what this is but it looks similar to HTML. For example, here is what I found in my file color.kvtml after creating three cards.
<?xml version="1.0"?>
<!DOCTYPE kvtml SYSTEM "kvoctrain.dtd">
<kvtml>
 <e>
  <o>black</o>
  <t>white</t>
 </e>
 <e>
  <o>red</o>
  <t>green</t>
 </e>
 <e>
  <o>yellow</o>
  <t>blue</t>
 </e>
</kvtml>
Based on what I see here it doesn't seem like it would be that hard to read this information and print it out on cards. It is certainly beyond my ability right now but it does give me hope it will happen.
Hal Stanton was a Windows user for too many years. Now I can honestly say that Linux is a lot more fun.
None provided.
|
...making Linux just a little more fun! |
By Dean Wilson |
Assigning an IP address dynamically is the most basic piece but there is a lot more. This includes the netmask, host name, domain name, gateway and name servers. In addition, it can supply other information such as a time server.
Many people are anti-DHCP because they only see it as a way that an ISP offers you an IP address that changes. This, of course, makes it difficult to advertise a server. On the other hand, DHCP can save you a lot of ongoing configuration work within your company or organization.
Besides the ISP-provided DHCP servers, they commonly exist in inexpensive router boxes. Netgeark, Linksys and other vendors offer these systems with multiple LAN ports, an 802.11b wireless interface or both. The Netgear RP114 is an example of the wired LAN only and the Linksys WAP11 of the 802.11b type. There are many other choices. The router box becomes the system the ISP knows about and all of your real computers hide behind this box.
Hide? Effectively, yes. What is visible to the public Internet is the router. The LAN has private IP addresses and uses Network Address Translation (NAT) to handle connections from the internal systems to the Internet. While this isn't really a firewall, NAT offers a basic level of protection.
Most routers in this class allow you to:
That is the basics of DHCP for Beginners. If all you are doing is trying to decide between using DHCP or a static IP address, this may be enough information. On the other hand, you could decide to run a DHCP server on a Linux system. In that case, there are more options.
Dhcpd from
ISC is the most common DHCP server shipped with Linux systems. When
started it takes its directions from a configuration file usually found
at /etc/dhcpd.conf. Here is a sample configuration file:
# Sample configuration file for ISC dhcpd

# option definitions common to all supported networks...
option domain-name "example.org";
option domain-name-servers ns1.example.org, ns2.example.org;

default-lease-time 600;
max-lease-time 7200;

# if you do not use dynamical DNS updates:
#
# this statement is needed by dhcpd-3 needs at least this statement.
# you have to delete it for dhcpd-2, because it does not know it.
#
# if you want to use dynamical DNS updates, you should first read
# read /usr/share/doc/packages/dhcp-server/DDNS-howto.txt
ddns-update-style none; ddns-updates off;


# If this DHCP server is the official DHCP server for the local
# network, the authoritative directive should be uncommented.
#authoritative;

# Use this to send dhcp log messages to a different log file (you also
# have to hack syslog.conf to complete the redirection).
log-facility local7;

# This is a very basic subnet declaration.

subnet 10.254.239.0 netmask 255.255.255.224 {
  range 10.254.239.10 10.254.239.20;
  option routers rtr-239-0-1.example.org, rtr-239-0-2.example.org;
}

# A slightly different configuration for an internal subnet.
subnet 10.5.5.0 netmask 255.255.255.224 {
  range 10.5.5.26 10.5.5.30;
  option domain-name-servers ns1.internal.example.org;
  option domain-name "internal.example.org";
  option routers 10.5.5.1;
  option broadcast-address 10.5.5.31;
  default-lease-time 600;
  max-lease-time 7200;
}

# Hosts which require special configuration options can be listed in
# host statements.   If no address is specified, the address will be
# allocated dynamically (if possible), but the host-specific information
# will still come from the host declaration.

host passacaglia {
  hardware ethernet 0:0:c0:5d:bd:95;
  filename "vmunix.passacaglia";
  server-name "toccata.fugue.com";
}

# Fixed IP addresses can also be specified for hosts.   These addresses
# should not also be listed as being available for dynamic assignment.
# Hosts for which fixed IP addresses have been specified can boot using
# BOOTP or DHCP.   Hosts for which no fixed address is specified can only
# be booted with DHCP, unless there is an address range on the subnet
# to which a BOOTP client is connected which has the dynamic-bootp flag
# set.
host fantasia {
  hardware ethernet 08:00:07:26:c0:a5;
  fixed-address fantasia.fugue.com;
}
The man page associated with this file, dhcpd.conf(5) is very thorough
and I am not going to attempt to reproduce all that information here.
Simply typing man dhcpd.conf will display it. It is over 25
printed pages but, should you want to print it for off-line study, the
following commands should suffice:
cd /usr/share/man/man5
zcat dhcpd.conf.5.gz | groff -man | lpr
The file is divided into two types of statements. Parameter statements
say how to do something of it dhcpd should do something. Declaraction
statements describe the network. Thus, parameters establish things which
declaractions may depend upon. In the example above
default-lease-time is an example of a parameter. The block
beginning with host fantasia { is a declaration. The option
statements appearing outside of any block are global parameters which
are global in scope. Those within declarations have a local scope.
I hope this introduction will help you work with DHCP. Being a DHCP client is very easy. On the server side it is not really complicated. Once you decide what you want your DHCP server to do, translating that information into what is needed in /etc/dhcpd.conf is a simple process.
Robert Wilson is a Systems Administrator in a company where the boss (who has no idea what Bob does) just says "make it work".
Dean Wilson is (this week) a systems administrator and occasional
updater to his pages at www.unixdaemon.net
|
...making Linux just a little more fun! |
By Dean Wilson |
For example, a few years ago I set up a a wireless link for a project. It was relatively slow (a real data throughput of around 300Kbps) but should have easily handled the traffic. Should have but it seemed saturated much of the time. On paper, everything was supposed to be fine. The link capacity was significantly more than the traffic. That was on paper.
There did seem to be a lot of lights blinking on the switch talking to the master radio but watching blinking lights to measure traffic is about as accurate as using your tongue as a battery tester. Starting up ethereal quickly identified the problem. There were a whole bunch of computers running some other operating system that liked to send broadcast packets over the network for such exciting events as a computer being turned on or the paper being low in a printer.
Once I had the problem identified, it was easy to correct. I just moved the radio traffic to another subnet away from the chatty operating system and performance was fine.
The synopsis in the man page says Interactively browse network traffic. My use above was in real time but Ethereal uses the same file format as tcpdump. So, you can take an old dump file and use Ethereal to analyze it. Besides this (libpcap) format, Ethereal will read many other dump formats including those from capture tools on other operating systems--even the chatty ones.
Like virtually all protocol analyzers, Ethereal shows you a summary line for a packet, a hex dump and the ability to drill down thru the protocol tree. In addition, you can define filters to select and display the data you are interested in. There are quite a few command line options but unless you want to plant Ethereal in a script, it is easier to interactively set it up to do what you want.
A word of warning. If you are monitoring live traffic for a system other than the one Ethereal is running on, make sure you are connecting at a point where you will see the traffic. Ethereal will set your local Ethernet interface into promiscuous mode which means it will see all the traffic. If, however, your system is connected to an Ethernet switch, only the traffic for your system will appear there. You may need to "splice in" to the place you want to monitor using a hub.
Besides the basic monitoring, there are lots of options.
In my example at the start of the article, I could have used a filter to
filter out the expected traffic. For example, adding tcp.port !=
80 in the filter window and clicking the Apply button would have
excluded any port 80 (HTTP) traffic from the display.
Colorize Display is also handy. Select Colorize Display from the Display menu and Ethereal will guide you through the setup. The steps are simple:
ip.addr == 64.12.24.5 would select any packets
whose IP from or to address is equal to 64.12.24.5. You don't
have to memorize all these choices as the Add Expression button
offers a list of all the choices.
I could continue to point out features but the best approach is for you to just give Ethereal a try. There are many choices and options that this article could quickly become a book. If you are used to doing systems administration you are probably satisfied in knowing about something new in your toolbox. When the need arises, you will make it do what you want.
Robert Wilson is a Systems Administrator in a company where the boss (who has no idea what Bob does) just says "make it work".
Dean Wilson is (this week) a systems administrator and occasional
updater to his pages at www.unixdaemon.net
|
...making Linux just a little more fun! |
By Dean Wilson |
These are formats where you need additional information in order to make any sense whatsoever of the data. The most popular example is the .doc format used by Microsoft Word. If you look at a Word document in a text editor you will not see your text. This problem alone makes this format useless for a system which much search and present data.
While there is no reason to dwell on this format, I would like to explain one additional concern which is applicable to many other situations than the one I am working on. It is quite common for the vendor to change the format over time claiming that they need to do this to enhance the capabilities of their programs. This may or may not be true but it can easily mean that some future version of their software will not use the same format making either your old data useless or making it impossible to create new data in the format you had originally used.
Because of the unsuitability of these types of formats for the system I am working on, I will not go into any further detail. The following formats are all text-based.
These languages allow you to see your original textual information within the document. The document contains information on how it is to be presented within the text itself. Examples of this type of markup are troff, TeX, Rich Text Format (RTF) and PostScript. Of these three examples, troff and TeX are by far the oldest and also by far the easiest to extract text from.
Troff was initially written to produce typoutput on a particular phototypesetter. There is a related program, nroff, which was designed to take the same basic document format and produce output on a regular printer. TeX (and LaTeX) were designed to typeset complicated documents containing special mathematical symbols not available in standard ASCII text. It is relatively easy to extract the input text from basic text documents in these formats. As the document content becomes more complicated, extraction also becomes more complicated.
Early on in the Word Processor Wars, Microsoft created a new standard (that is, they called it a standard) for document interchange called RTF. Unlike troff or TeX, the user wasn't supposed to create documents in RTF. It was just to be used as an interchange medium between different word processors.
Finally, PostScript was written to be a descriptive language for files that was independent of output devices. For example, the same PostScript document could be printed on a relatively inexpensive laser printer with 300 dot per inch resolution or on a phototypesetter with 3000 or greater dot per inch resolution.
In all these languages, the emphasis is on describing what you want the document to look like. You describe font sizes, type styles and positioning within the page. In order to search the original text of the document you must strip out all this formatting information.
As you can see from the previous descriptions, none of these formats make the original information available for easy searching. Also, you need some sort of conversion program to translate these document formats into the various presentation formats.
Long before Microsoft created the "RTF standard", SGML was around. SGML is a generalized source document markup language that is designed to specify what is in a document rather than how it is to be displayed or printed. SGML, however, is general enough to be complicated for the user and for a slow computer to work with.
HTML is close to a dialect of SGML. Close because HTML does not obey all basic SGML conventions and a dialect because HTML defines specific document markup which can be used. For example, the <p> markup is used to identify the beginning of a paragraph. There are two problems here with regard to what I need to do:
Also, HTML has evolved to such an extent that there are a large number of tags. Many of these tags have to do with presentation rather than offering any information about the actual use of the document content. Examples here are the strong, bold and italic tags.
Let me list what I have learned so far.
It would be relatively easy to write such a markup. In fact, I have done this many times for specific projects. I remember one very basic system where I used a single letter followed by a colon to identify the type of data a record contained. Records were separated by a newline character. Even if we knew all possible record types, there is still a very significant limitation in this sort of implementation. You cannot describe relationships within the data.
A rather obvious example is an address. If you impose a structure on it that is applicable to an address in the United States you might end up with something like this:
Name|Addr1|Addr2|City|State|ZipThinking on more global terms, you could add country to the end of the data. Unfortunately, you would then discover that in Spain, for example, postal codes go before the City.
While you could then write code to look in the seventh field (country) for Spain and modify how the information is printed you would quickly discover there were many other exceptions. With the relatively low cost of data storage today, a better approach would be to add more information about the information within the data record. If this information was about what the data was rather than how to process it and it was put in in a well-structured way, it would be very easy to work with.
Enter XML which stands for Extensible Markup Language. XML is designed to do precisely this job. Looking back at the address model, you could present the address in XML like this:
  <address>
    <name>Name</name>
    <addr1>Addr1</addr1>
    <addr2>Addr2</addr2>
    <city>City</city>
    <state>State</state>
    <zip>Zip</zip>
  </address>
There is nothing special about the spacing and indentation. This is just to make it clear to the reader what I am doing. The only thing that is important is that the address information starts with <address> and ends with </address>.
Adding a place for country is as easy as defining the <country> tag. Presentation rules do not have to be put into the data itself. There is another language, XML Stylesheet Language Tranformations (XSLT) that allows you do define processing rules to translate XML into desired output formats.
The most important part of this exercise for me was being able to look at existing formats and pick a good solution. Sometimes a new approach or format needs to be developed (PostScript is a good example) but it is always going to be less work if you can start with something that exists.
Because XML is extensible you are not picking something that is a close fit. You are actually selecting an exact fit that allows you to address your future needs. With all the different tools available for XML and XSLT and the number of uses expanding every day, developing your applications around this format will get easier in the future.
Robert Wilson is a Systems Administrator in a company where the boss (who has no idea what Bob does) just says "make it work".
Dean Wilson is (this week) a systems administrator and occasional
updater to his pages at www.unixdaemon.net
|
...making Linux just a little more fun! |
By LG Staff |
The spreadsheet (OpenOffice Calc) that comes bundled in OpenOffice.org can act as a simple database. For each table, create a sheet. Set up all of your records as rows, with the first row in each sheet containing titles for each column.
In the document where you'd like to use the database, add the spreadsheet as a data source (Tools -> Data Sources), and then do whatever you would like with the data (usually this is setting up an interface to the database by adding form controls to the document). The OOo help on the subject is quite helpful.
Look at knoda.
It has a table designer, visual form designer, visual report designer,
and its scriptable using python. Have not used it, only looked at the
screenshots, so I can't say anything about its stability or usability.
This may be a little heavy for the basic user but once you have it all set up the user just has an easy web-based interface to the data.
Linux Gazette staff and authors.
|
...making Linux just a little more fun! |
By LG Staff |
For more info, or to register, go here.
Linux Gazette staff and authors.
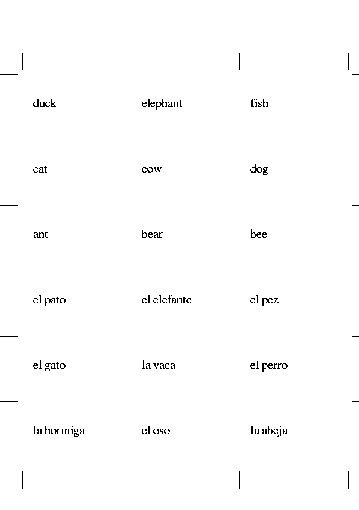